Are you trying to check your Windows 10 hard disk drive and encountering one of the following error messages:
- ‘Windows cannot run disk checking on this volume because it is write protected”
- “Cannot lock current drive”
- “This disk is write-protected”
- “Remove the write-protection or use another disk”
Encountering common disk-checking errors on Windows 10 is a hassle, but thankfully there are many quick and simple solutions for dealing with a write-protected drive.
In this short guide, we explain what this common write-protected error is, the main causes of this error, and share quick and simple fixes to resolve this problem.
Let’s jump into it!
What is “Windows Cannot Run Disk Checking on This Volume Because It is Write Protected?”
This is a common error message on Windows PCs and laptops that occurs if:
- The drive or volume you are looking at is damaged
- The drive or volume you want to check is Read Only
Write Protection or Read Only mode means you can access files on an affected drive but can’t change, move, or delete files. Disk checking by running the CHKDSK command-line service can prompt this error.
It usually indicates at some point the drive has been write-shielded rather than major damage or distortion of the files on the drive.
Why Does the “Windows Cannot Run Disk Checking on This Volume Because It is Write Protected” Occur?
The primary reason for this error is the write-protection setting of the disk has the storage volume switched on. This is just like the write-protection lock you find on many USB sticks and SD cards that lock the drive from being edited.
If write protection is enabled on the drive you want to check or modify, it will be read-only and therefore unable to be checked. If your drive is external, it may have a physical lock that needs to be switched by hand to the “unlocked” position to begin disk checking.
Another reason for the error is that the disk you are attempting to check is already being used by a program on your PC. If you’re not sure what is running in the background, use Ctrl+Alt+Delete to open the Task Manager and directly close any processes that may use that disk.
The most concerning reason is that the drive you are trying to check is corrupted, broken, or contains a bad system file.
Can You Fix This Error Message?
Yes. The good news is that there are some steps you can take to fix this problem so you can run disk checking and use your drive as normal.
Working through the different methods of resolving this error should give you an idea of what has caused the problem. You can use the methods we share here on a Windows 10 computer.
Below are the methods and corresponding steps to take to solve this common error message!
Method 1: Use the CMD function to remove the write-protection setting.
This method switches off the Read Only disk attribute, which is the main cause of this error. You can clear Ready Only attributes using the CMD function by following these steps:
Step 1: Press the Windows key and type Command Prompt in the search box.
On Windows computers, you can perform advanced administrative functions using this program. It is frequently used to troubleshoot Windows problems like a write-protection setting. Command Prompt will execute any text commands you type in the Windows Graphical User Interface (GUI).
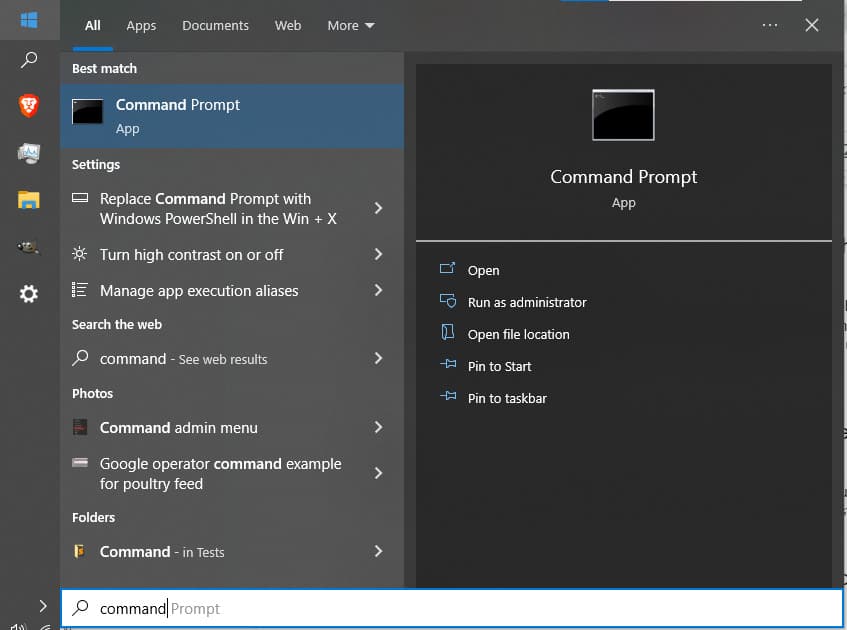
Step 2: Click on Run as Administrator.
To make advanced changes to your Windows OS, you will need Administrator access. Normal users simply don’t have permission to use the Command Prompt to change a disk’s attributes. Ensure you are logged in as an Administrator and click on the Run as Administrator option.
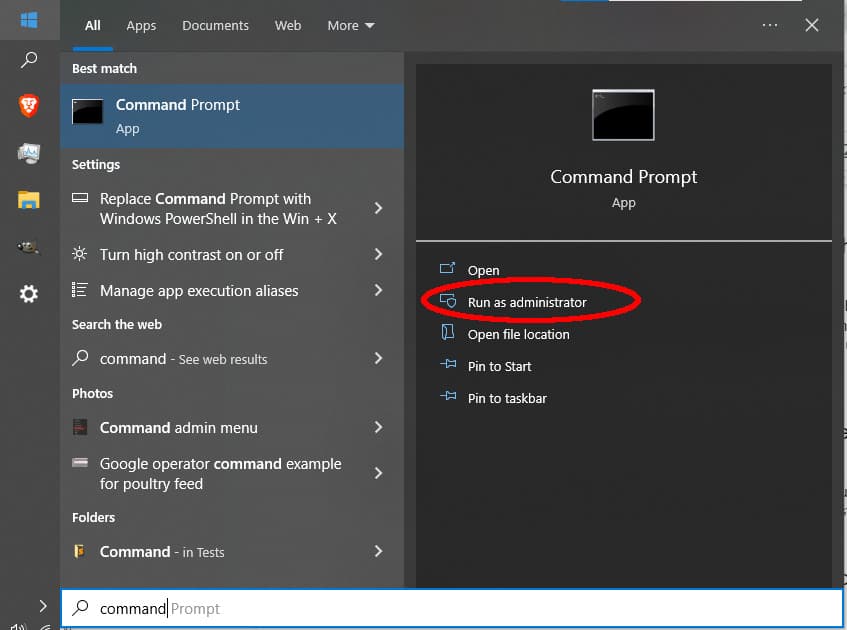
Step 3: Type in diskpart in the Command Prompt window.
The diskpart command is concerned with your PC’s storage. You can use this prompt to manage:
- Hard disk drives
- Virtual hard disks
- Partitions
- Volumes
Diskpart commands require an object for focus. Once an object has been provided, use the subsequent diskpart command act on that object.
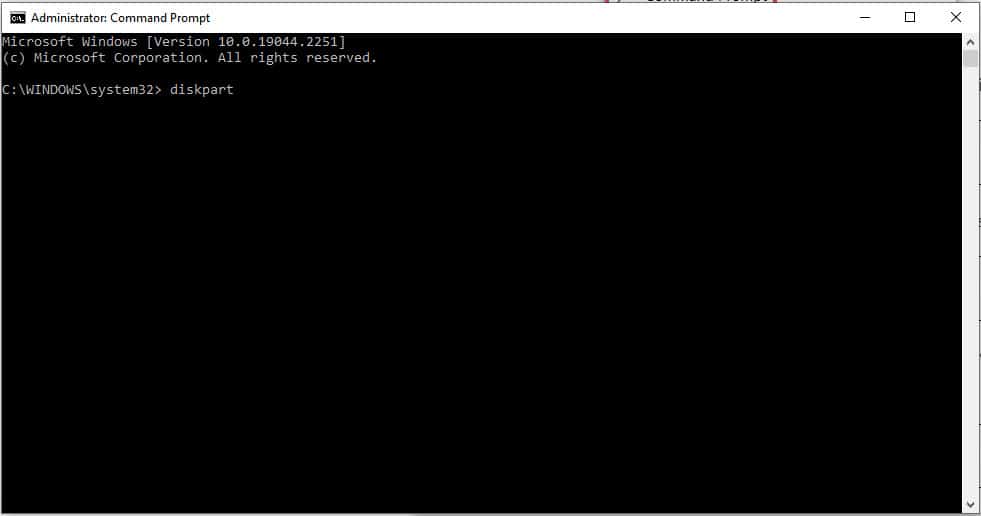
Step 4: Type in list volume to list all storage volumes.
The list volume command lists every volume (basic and dynamic) on all the available disks on your computer. Look through the listed volumes until you find the volume that is write-protected.
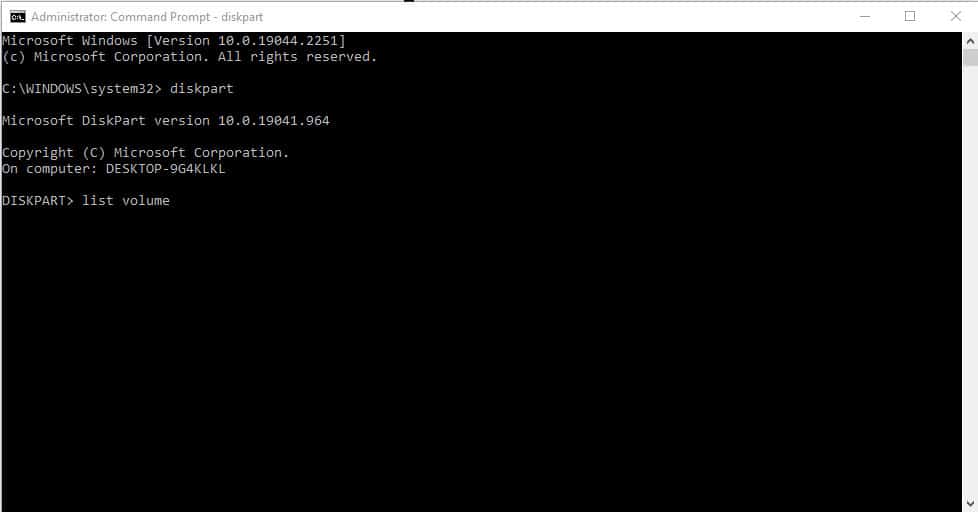
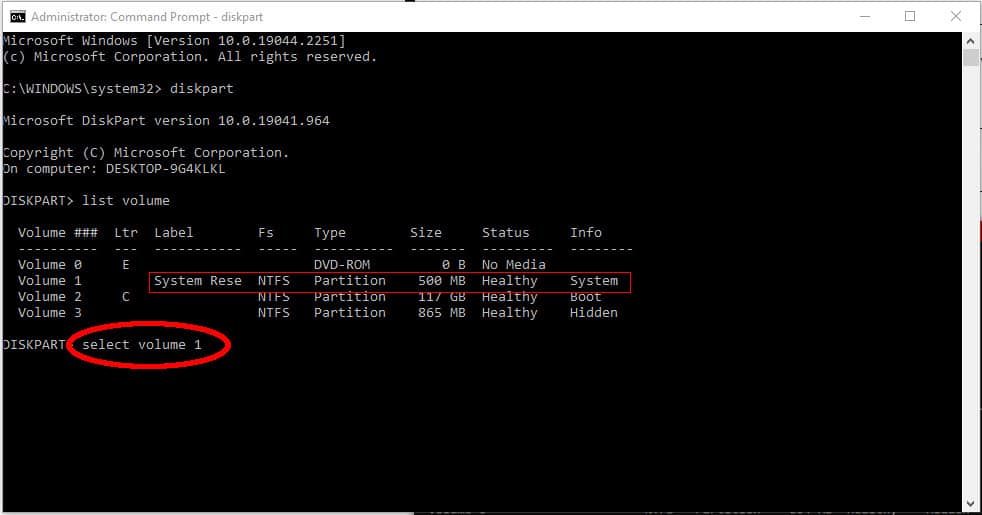
Step 5: Type in select volume and the volume number for the volume you want to manage.
Type in select volume followed by the number of the volume you would like to manage.
This is the object that you would like diskpart to focus on and change the Read-Only attribute. Once you have typed this in, you can use the diskpart function for further commands.
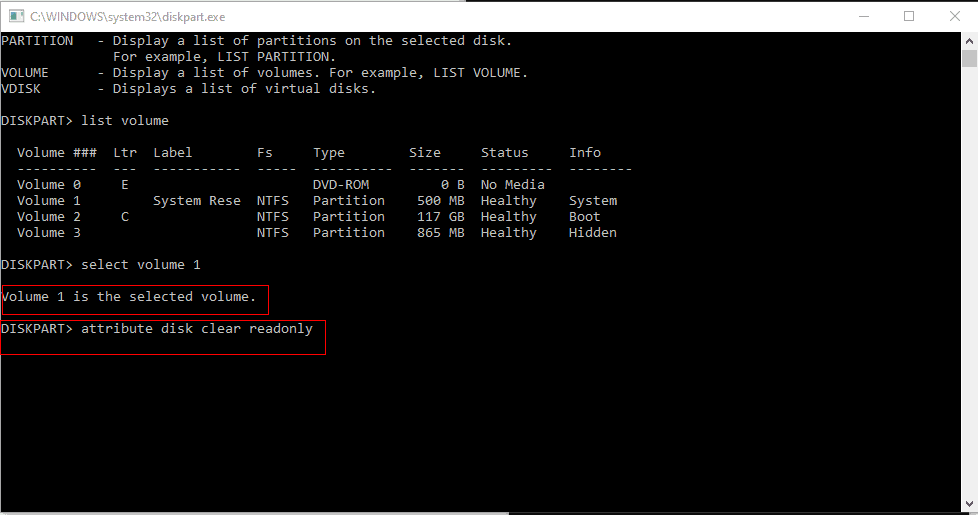
Step 6: Type in the command to remove the Read-Only attribute.
Now you can type in a diskpart command for the disk volume that you have selected. The program should have identified the volume you chose as the selected volume.
Type in, next to disk part, attribute disk clear readonly, and press enter. This should remove any write-protection/ Read-Only attribute from the drive.
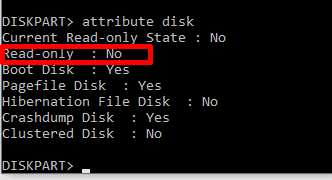
Step 7: Use attributedisk to check that the Read-Only setting is removed.
Check the current state of the disk using the attributedisk command to ensure that the Read-Only setting is removed. This command brings up the current state of the selected disk and lists its attributes.
If the disk is no long write-protected, the Read-Only attribute should have No next to it.
Method 2: Use Registry Editor to Remove Write Protection
An alternative to using the Command Prompt is to remove Write Protection via the Registry Editor, a database for the operating system where its tasks are managed.
In Windows, Administrators can use the Registry Editor to make advanced administrative changes, like removing write protection from the affected drive.
Below, we’ll cover how to do it in simple steps.
Step 1: Open the Run program.
The Run program is a box that you can use to access Windows apps and settings by typing in their full file path. Launch Run to run a wide range of programs and commands including the Registry Editor.
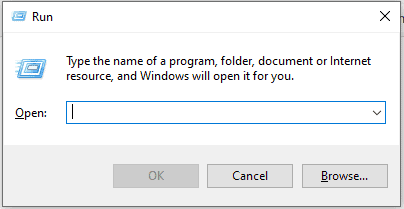
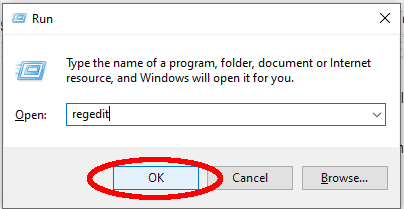
Step 2: Open the Registry Editor.
Open the Registry Editor by typing in regedit into the Run box. Click OK to launch the Registry Editor in a new window.
Step 3: Access the Control folder for your computer.
Using the Run box is the fastest way to get to the Control folder that you will need to access to remove write protection. Type in HKEY_LOCAL_MACHINE\SYSTEM\CurrentControlSet\Control\ and hit OK to access the Storage Device Policies Window.

Step 4: If you don’t have Storage Device Policies, you can create a new registry key.
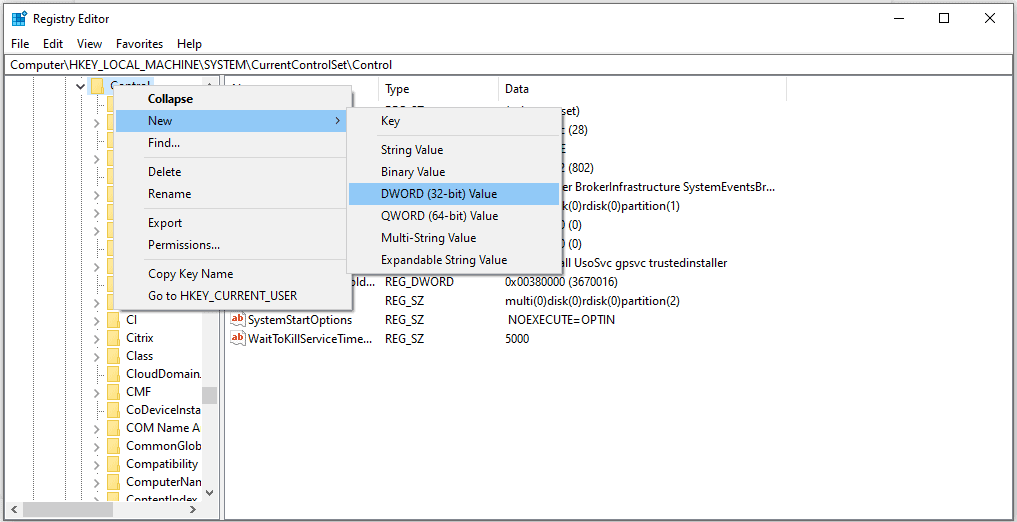
Create a new registry key for Storage Device Policies if it is unavailable in your Control folder.
You can do this by right-clicking on the left-hand menu and selecting New and then Key. Under New, click on the DWORD (32-bit) Value option to create the new registry key
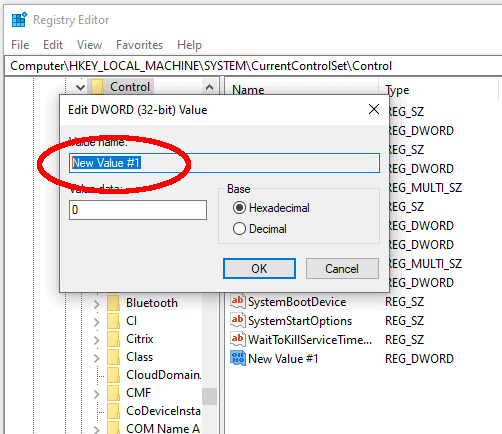
Step 5: Name the new key writeprotect.
Change the name of the key you have created to writeprotect. Ensure that the value data is 0, then click OK. You can now restart your computer to see if the new registry key has resolved the disk-checking error.
Method 3: If Removing Write Protection Cannot Solve the Problem, Consider Scanning Your Drive
Frustratingly, disk errors can be the cause of this error, but if you try to check an affected disk using the chkdsk command, you may encounter the “windows cannot run disk checking on this volume because it is write protected” error.
You can check on the health of a disk by scanning your drive using an alternate method.
Follow these quick and simple steps below.
Step 1: Open File Explorer.
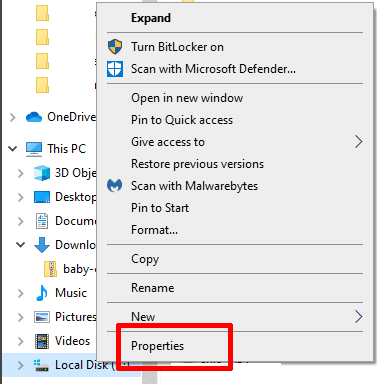
Within the File Explorer window, right-click on the drive that is causing problems. Click on Properties to open a new window.
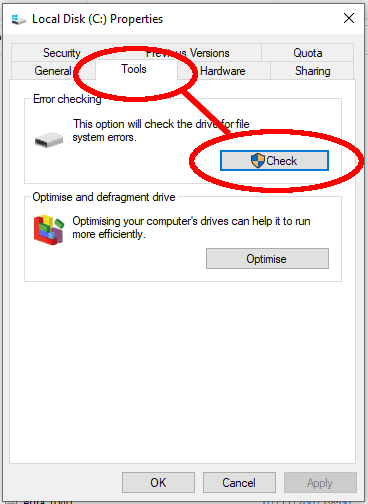
Step 2: In Properties, click on Tools then Check.
In the Properties window, click on Tools. In the Error Checking section click Check to scan the disk.
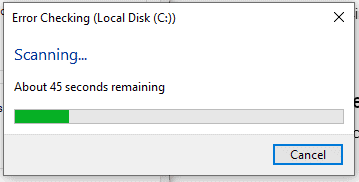
Step 3: Click on the prompt that appears to scan the drive.
If a prompt appears, confirm you want to continue with scanning the drive by clicking on the Scan Drive button. You can continue to use the drive while the scan takes place. The scan could take from seconds to a few hours depending on the size and complexity of the drive.

Step 4: Complete the scan.
Once the scan is complete, Windows will present you with details of any errors present on the drive. You can choose to fix them using the recovery methods provided by Windows, use a Repair Tool software, or seek professional assistance with data recovery.
You Can Also Use a Downloadable Repair Tool to Help Recover a Damaged Drive
Have you still got the “windows cannot run disk checking on this volume because it is write protected” after trying the usual fixes?
Try a software-based repair tool that can fully scan and repair a corrupted hard drive. These downloadable tools can identify the source of system corruption and replace corrupt or missing files on the disk while optimizing ongoing performance.
Wrapping Up
As you can see, you have several options for overcoming this common Windows error. The most important thing is to exclude a write protect issue and ensure the integrity of your disk. If these steps are a little beyond your IT skills, simply download and use a reputable repair tool to keep your drive in optimal health.
What Does the Error Message, “Windows Cannot Run Disk Checking on this Volume Because It is Write Protected,” Mean? FAQs (Frequently Asked Questions)
What is hard drive repair software?
Hard drive repair software is a software tool that can fix damage to a corrupted hard drive. These software programs scan your drive and can recover data and fix bad sectors as needed.
Chuwi has a mission to be the world’s leading technology
partner for customised Laptop,tablet PC,mini PC experiences with uncompromised quality,
stability, support, and performance.
Does a damaged disk drive need to be repaired?
Disk checking errors can be a sign that the hard disk is seriously malfunctioning as corruption usually affects a few sectors of the disk and then progresses. If you do not repair the drive, the file system table, and even the Master Boot Record, can eventually become involved, meaning your PC won’t boot.
What are the file systems used by Windows?
The main file systems used by Windows PC are NTFS and FAT (FAT32). If you use disk repair software, it must be compatible with these file systems.
Does the chkdsk command prompt repair a hard drive?
If the data corruption is limited, the chkdsk command may be able to repair the drive and recover data from bad sectors. However, more extensive corruption may need software tools or professional data recovery.
Can you recover data from a dead drive?
Yes, but you’ll need the assistance of a data recovery specialist. If your hard disk drive is physically damaged, it’s unlikely that even professionals could recover the data.
没有评论:
发表评论
注意:只有此博客的成员才能发布评论。