Configure a Mac mini For Use
How to Configure a Mac mini For Use Without a Computer Monitor 2019
What is Screen Sharing in macOS?
Basically, Screen Sharing is a simple method baked into macOS that lets users remotely control a Mac from another computer.
When you have Screen Sharing enabled, you can connect to, say, a Mac mini and start up a session on that computer.
From there, the Mac mini’s desktop will become visible and you can use the machine as if it’s actually connected to your monitor.
This, of course, is very handy so you can manage and tweak your Mac mini’s settings without needing to connect it to a mouse, keyboard and display first.
Here’s how to use it.
First, Configure Your Mac
Before you’re able to set up a Mac mini for use without a computer monitor or other peripherals, you’ll need a monitor (and a keyboard and mouse) to set it up.
Just plug all of your peripherals into your new Mac mini. Then, power it on and run through the standard macOS set up process.
How to Enable Screen Sharing
Open System Preferences.
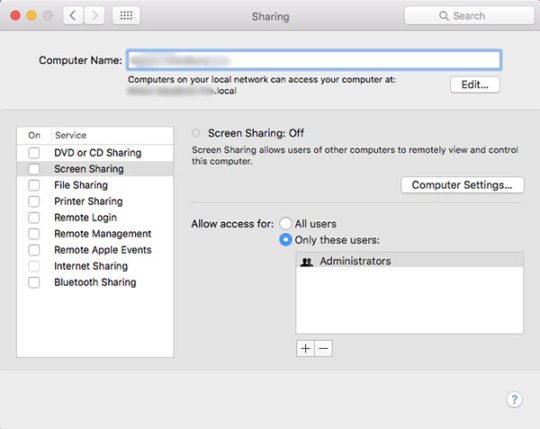
Click on Sharing.
Write down the text next to Computer Name. You’ll need the name to connect remotely to your Mac mini.
You can also take note of the address, for an alternative method of connecting to your Mac mini.
Ensure that Screen Sharing is enabled by clicking on Screen Sharing in the left-hand menu. You should see the toggle in the middle turn green.
If you only want certain users to have access to connect to your Mac mini, look to the Allow access for box.
Either select All Users, or click the box next to Only these users: and add the specified users from there via the + add icon.
You can add users from Users & Groups, which includes users on your Mac.
Network Users or Network Groups includes users and groups with network server accounts.
You can also turn on Anyone may request permission to control screen. This lets another user request permission before Screen Sharing can commence — you have to explicitly accept them, but it doesn’t require a password.
Lastly, if you’d like to remotely connect to your Mac mini from a Windows PC or another non-macOS machine, you’ll need to carry out a few additional steps.
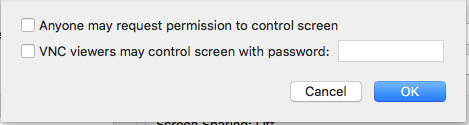
Click on Computer Settings.
Check the box next to VNC Viewers may control screen with a password.
Set a password for a non-Mac machine to use when connecting — be sure to write it down somewhere safe.
Worth reading:Best youtube downloader online download youtube 1080p
When you’re done, click on OK.
From there, you can use a VNC viewer app to remotely access the Mac mini on an iPad or another computer. You just need the password.
Using Screen Sharing
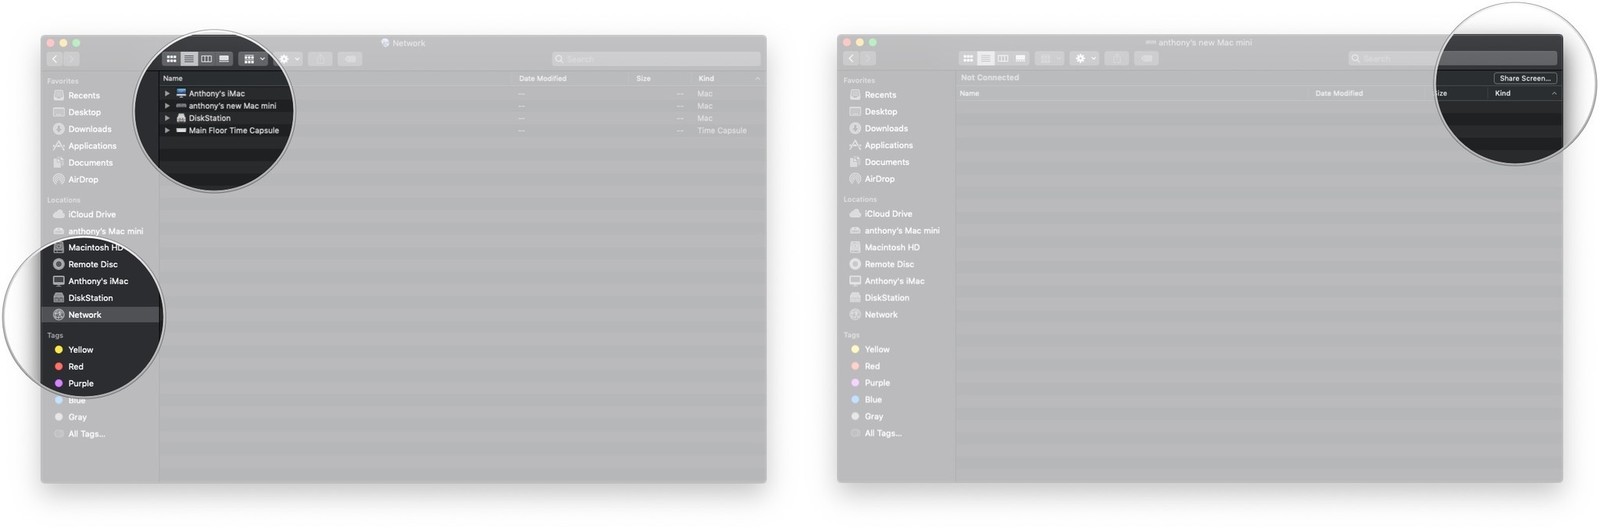
Once it’s configured, you can easily access Screen Sharing through the native Finder app.
Do note that both computers must be on the same Wi-Fi or internet network for this to work. It’s also helpful to have both computers signed into the same Apple ID — otherwise, you’ll need to enter the Apple ID and password of an authorized user.
Open the Finder app.
Under the Locations subheading, click on Network.
Double click on the Computer Name that you took note of or wrote down earlier.
Click on Share Screen.
If prompted, enter your User Name and Password.
Click on Sign In.
Alternatively, you can open Finder, click on Go > Connect to Server, and enter the address of the Mac you’d like to Screen Share.
Adjusting Some Settings
When you’re using Screen Sharing, you can also set various preferences that could be helpful.
On your Mac mini, just click on the Screen Sharing menu in the top bar and select Preferences. You’ll find various options for scaling the shared screen, changing its quality on network conditions, and blocking certain users.
You can find a similar suite of settings on the Mac you’re shared to by clicking on the View tab.
Sponsor ads:
Gihosoft Free iPhone Data Recovery:https://www.gihosoft.com/iphone-data-recovery-free.html
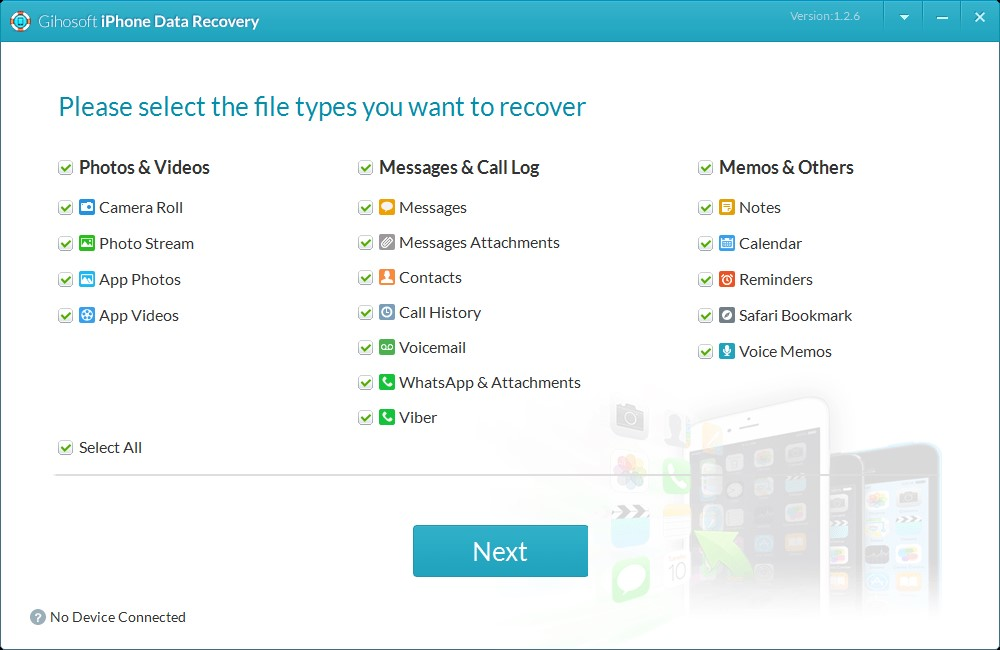
Gihosoft iPhone Data Recovery Free
Worth reading:Best youtube downloader online download youtube 1080p Free iPhone Data Recovery Software for Windows/Mac
Recover up to 12+ types of files, including contacts, SMS, photos, WhatsApp, Viber, notes, etc.
Restore lost data from iOS devices directly or from iTunes and iCloud backup
Recover iPhone data lost due to iOS upgrade/jailbreak, accidental deletion, device lost or broken
Also Read:Best 6 Photo Organizer – Photo Organizing Software for Windows & Mac
Also Read:10 Best Free Audiobook Apps for Your iPhone or iPad in 2019
Also Read:How to Fix Insufficient Storage Available Problem on Android
Also Read:How to Recover Deleted Contacts with Gmail Account on AndroidSupport all the latest iPhone, iPad and iPod Touch
Both Free and Pro version.
If you lost data after you updated to a new iPhone, you can always use Gihosoft iPhone Data Recovery to get the data back from the old iPhone or backup.You may also like: iphonerecovery.com
If you use android phones, please choose Gihosoft Android Data Recovery.
With Gihosoft Android Data Recovery, no longer afraid of data loss!
jihosoft Free iPhone Data Recovery
Gihosoft Android Data Recovery
Also Read:How to Change Message/iMessage Background on iPhone with/without Jailbreak
Gihosoft Android Data Recovery
Also Read:What is iTunes Helper & How to Disable it from Windows/Mac PC
Also Read:How to Fix Windows was Unable to Format SD Card/USB Drive
Also Read:SWF to MOV – How to Convert Flash SWF to MOV
Also Read:Whatsapp Text Tricks: Type Bold, Italics & Strikethrough WhatsApp Texts on iPhone
Also Read:How to Recover Deleted Photos from Samsung Galaxy Note
Also Read:Top 8 Best Alternative Websites to MamaHD 2019
How to set up your new Mac mini for use without a monitor

Have you bought a new Mac mini to serve as a network appliance of some sort? Perhaps it's to serve files to your network and provide rendering capabilities with Compressor or maybe it's going to run a Plex media server and share printers. You'll not want to waste resources on the device such as connecting a permanent monitor or keyboard/mouse combo. Whatever your purpose for the new Mac mini, we'll show you the basics of what you'll want to set up to run your new Mac mini without a monitor.
Make certain the new Mac mini is properly configured
Screen Sharing vs Remote Management
Turn on Screen Sharing
Connect to your new Mac mini remotely
Continue to remotely install and configure your headless (sans monitor) Mac mini
Final comments
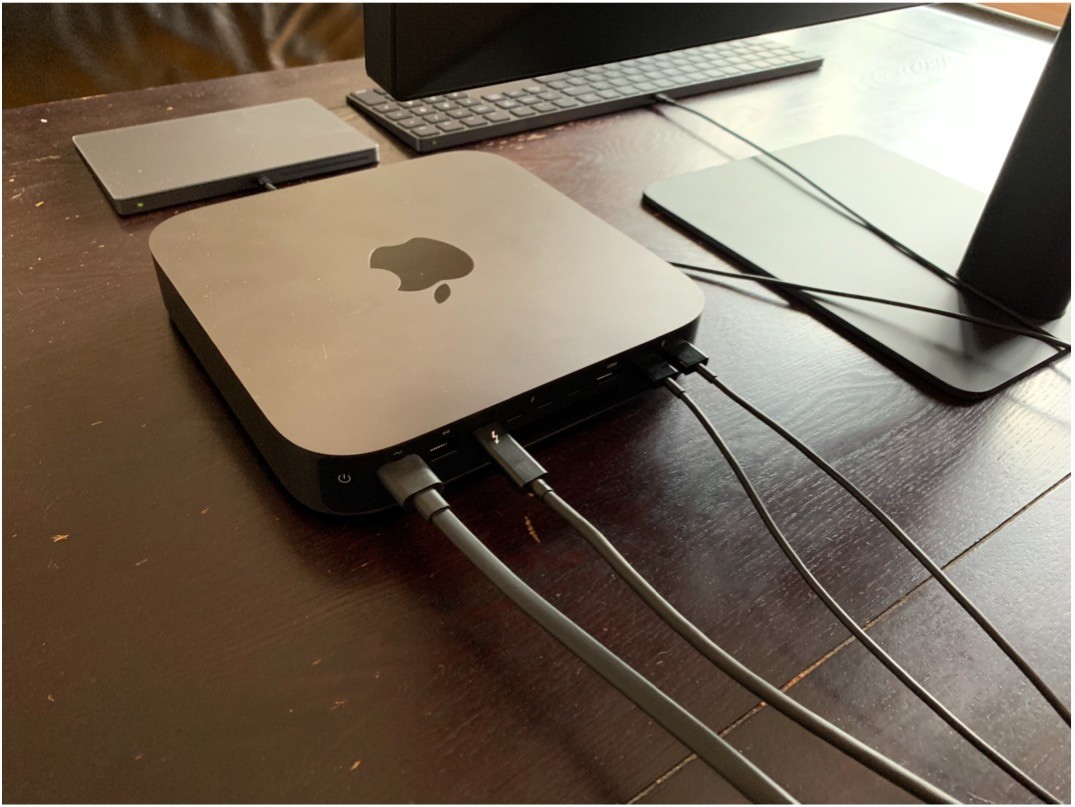
Make certain the new Mac mini is properly configured
In order to set up the new Mac mini for use without a monitor and keyboard/mouse, you'll actually need to have it connected to, you guessed it, a monitor and keyboard/mouse. You can follow our new Mac mini setup guide if you need help with getting things started. In short, have your new Mac mini set up like a regular desktop, ready to go so that we can configure somethings locally before disconnecting peripherals like the monitor and keyboard.
Screen Sharing vs Remote Management
Apple offers two methods of remotely connecting to your new Mac mini. Screen Sharing and Remote Management. Screen Sharing offers a remote user to connect to the Mac mini and start up a session whereby a view of the Mac mini's desktop becomes visible and accessible as if the user were sitting right in front of a locally connected display. The connection is established via virtual network computing(VNC) and as such you'll have a direct albeit slightly sluggish connection to your new Mac mini's desktop. Here you'll be able to install software, reboot, run updates just like you normally would from a directly connected monitor setup.
Remote Management offers the same accessibility as Screen Sharing does but it also provides finer tuned accessibility to the remote Mac. It offers methods to install reboot and update remotely connected Macs without direct desktop access when it isn't called for and it provides remotely accessible system alerts. Remote Management is typically used by system administrators in larger companies that want to administer a multitude of hardware from a single location.
We'll be focusing on home use and as such we will enable Screen Sharing.
Turn on Screen Sharing
The first step is to turn on Screen Sharing. Once we've set up this service, you'll be able to remotely connect and install or configure whatever you like without the need of a monitor connected to the Mac mini.
Start System Preferences.
Click Sharing.
Take note of the Computer Name. You'll need to know it to be able to connect to the Mac mini remotely later.

Check the Screen Sharing Service to ON.
If you want to connect from a non-macOS computer, click Computer Settings.
Check VNC viewers may control screen with password: and set a password for those machines to access the Mac mini.
Click OK.
If you need to specify certain users to have permission to remotely connect to the Mac mini, click Allow access for: and add and remove users as needed.
Done.

Your Mac mini is now ready to have the monitor and keyboard/mouse detached. Optionally, you can test your connection from a remote Mac before you do so.
Connect to your new Mac mini remotely
On a separate Mac, you'll be able to access Screen Sharing through the Finder.
Start Finder.
Under Locations, click Network.
Double-click the Computer Name from step 3 in the "Turn on Screen Sharing" section above.
Click Share Screen.
Enter your User Name and Password when prompted.
Click Sign In.

You'll now see your new Mac mini desktop ready at your command!
Continue to remotely install and configure your headless (sans monitor) Mac mini
You can now use the Mac mini's Screen Sharing capabilities to continue to make changes and install software. Apple's built-in services like File Sharing, Printer Sharing, and Content Caching are easily enabled with simply checking the appropriate box under the Share preference panel in System Preferences. Once you're done, simply exit the Screen Sharing application.
Final comments
Keep in mind that Screen Sharing and Remote Management are an either/or option. If you feel the need to be able to remotely manage your Mac mini with the more advanced toolset under Remote Management, simple un-check Screen Sharing and check Remote Management under the Share panel in System Preferences. Ensure that you set the VNC password if you have non-macOS machines to connect to your new Mac mini. Let us know what you plan on using your Mac mini for in the comments!
How to Force Restart a MacBook, MacBook Air, and MacBook Pro
Force restarting a MacBook, MacBook Air, or MacBook Pro is generally considered a last resort, but if the worst happens and your machine freezes up, it's the quickest way of getting things running again.

Before taking this extreme option though, it's worth making sure that you've exhausted all potential software solutions.
If it's just an application that's frozen rather than the operating system, hold down the Option (⌥) key then right-click the offending app's icon in the Dock and select Force Quit.
If the OS is frozen but the mouse cursor still responds, click the Apple () symbol in the upper left corner of the screen and select Restart. Otherwise, try holding down the Control (Ctrl) key and pressing the power button. If the system shutdown dialog appears, select Restart from the available options.
On MacBooks with physical function (F1–F12) keys, the power button is the key in the upper right corner of the keyboard (if it's an older Mac with an optical drive, this is also the Eject button).

Touch ID button on a 2018 MacBook Air
On a 2018 MacBook Air, the power button is the Touch ID button in the top-right corner of the keyboard, and on a MacBook Pro with a Touch Bar, it's the Touch ID surface on the rightmost side of the Touch Bar.
How to Force Restart Your Mac
Press and hold down the Command (⌘) and Control (Ctrl) keys along with the power button (or the Touch ID / Eject button, depending on the Mac model) until the screen goes blank and the machine restarts.
If your MacBook repeatedly freezes and you're unsure what's causing the problem, consider restarting your Mac in Apple Diagnostics mode to check if it's a hardware issue.
Restarting Other Devices
Don't have an Apple notebook? Make sure to check out our guides on how to force restart other Apple products, listed below:
How to Force Restart iPhone X, iPhone XS, iPhone XS Max, and iPhone XR
How to Force Restart or Hard Reset the iPhone 8 and iPhone 8 Plus
How to Force Restart iPhone 7 and iPhone 7 Plus
How to Force Restart iPhone 6s and Earlier Models and Enter DFU Mode
How to Shut Down or Force Restart Your 2018 iPad Pro
How to Enter DFU Mode on iPhone 8, iPhone X, iPhone XS, iPhone XS Max, and iPhone XR When Recovery Mode Doesn't Work
How to Reset or Force Restart Your Apple Watch
Apple's HomeKit framework allows you to easily control compatible connected smart devices you have installed in your home using the Home app on iOS. However, there are some features of HomeKit that require you to designate a device as a Home Hub, which remains powered on and connected at your home when you're away.
The main benefit of setting up a Home Hub is that it allows you to use location-based automation features if your HomeKit devices support them. For example, some thermostats can change the temperature to something more economical whenever you leave your home by using a virtual geographical boundary (geofencing).
A Home Hub also allows you to use Siri to trigger actions when you're away from home. For instance, if you're leaving the office, you could ask Siri to increase the temperature of a connected thermostat at home so that it's nice and cozy when you arrive.
How to Set Up an iPad as a Home Hub for HomeKit Devices
You can use an iPad as a Home Hub (just like you can use an Apple TV or HomePod), and the setup process is incredibly easy. Simply follow the steps below.
How to Set Up an iPad as a Home Hub for HomeKit Devices
How to Set Up Your iPad as a Home Hub
Launch the Settings app on your iPhone or iPad.
Scroll down and tap Home.
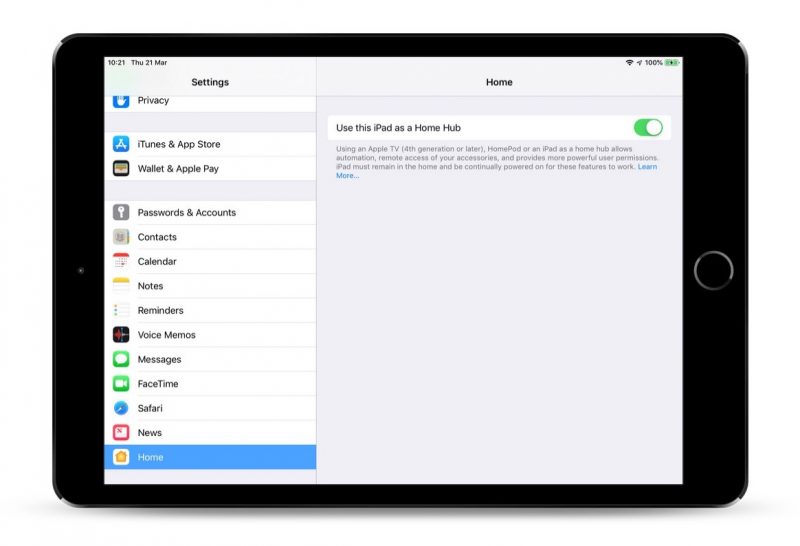
Toggle the switch to the green ON position next to Use this iPad as a Home Hub.
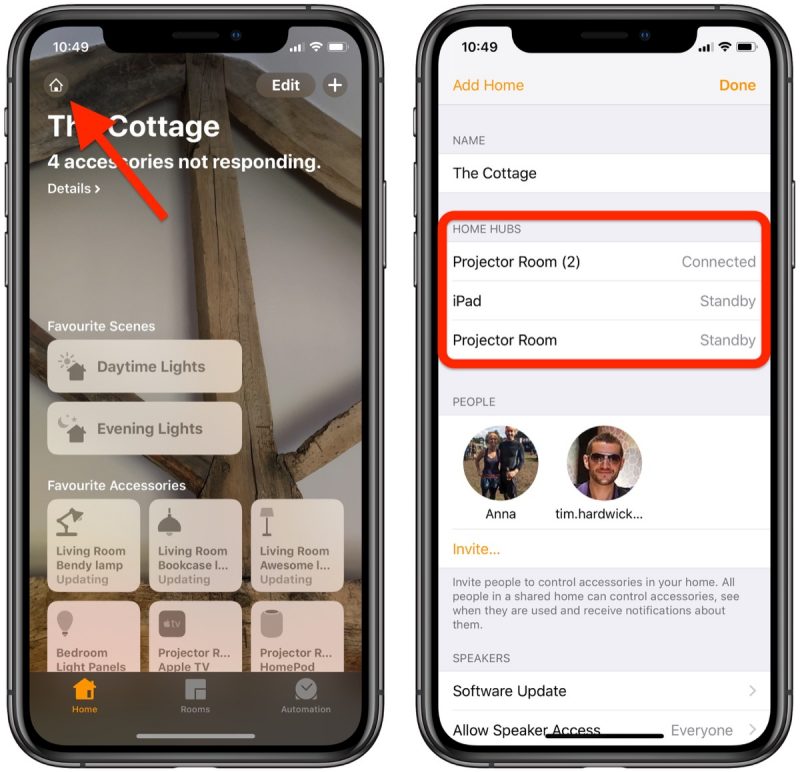
You can check the status of your home hub to see if it's connected in the Home app on your iOS device. Tap the Home icon in the upper-left corner of the screen. (If you have multiple homes set up, tap Home Settings next, then tap a home.) Look under Home Hubs to see if your home hub is connected.
Now that you have a Home Hub set up, the next time you're away from home you can give Siri commands on your iOS device to trigger actions, which will obviously depend on the sort of accessories you have installed.
A couple of examples might be "Turn on the living room light" or "Open the garage door," or you could ask Siri to check the temperature of a thermostat, for example. You can find Apple's regularly updated list of all HomeKit-compatible devices here.
How to Set Up an iPad as a Home Hub for HomeKit Devices
Also Read:jihosoft Free iPhone Data Recovery
Sponsor ads:
Gihosoft Free iPhone Data Recovery:https://www.gihosoft.com/iphone-data-recovery-free.html
Gihosoft iPhone Data Recovery Free
Free iPhone Data Recovery Software for Windows/Mac
Recover up to 12+ types of files, including contacts, SMS, photos, WhatsApp, Viber, notes, etc.
Restore lost data from iOS devices directly or from iTunes and iCloud backup
Recover iPhone data lost due to iOS upgrade/jailbreak, accidental deletion, device lost or broken
Support all the latest iPhone, iPad and iPod Touch
Both Free and Pro version.
If you lost data after you updated to a new iPhone, you can always use Gihosoft iPhone Data Recovery to get the data back from the old iPhone or backup.You may also like: iphonerecovery.com


Do you need to increase your credit score?
回复删除Do you intend to upgrade your school grade?
Do you want to hack your cheating spouse Email, whatsapp, Facebook, instagram or any social network?
Do you need any information concerning any database.
Do you need to retrieve deleted files?
Do you need to clear your criminal records or DMV?
Do you want to remove any site or link from any blog?
you should contact this hacker, he is reliable and good at the hack jobs..
contact : cybergoldenhacker at gmail dot com
回复删除I can’t say much but with my experience through divorce, I had no one until I met hackingsetting50@gmail.com online then I contacted him, surprisingly he helped me hack into my partner's phone and all his social media platforms and i can now access everything and even documented and printed stuffs to show as evidence , now I’m happy with my kids and working for Riches. I hope this helps anyone in need.
Thanks.