2018年10月3日星期三

How to Transfer Music From Old iPhone to iPhone X/8 2019


Transfer Music From Old iPhone To iPhone X/8 via iTunes Home Sharing

Step 1: Go to Settings > Music with the iPhone that has the music on it.

Step 2: Find Home Sharing by scrolling down.

Step 3: Enter your Apple ID and Password.

Step 4: Repeat steps 1,2,3,4 on the iPhone you want to transfer the music to.

Step 5: Open the music app on the iPhone you want to send music to.

Step 6: If you use Apple Music, go to “My Music” and then “Songs” or “Albums” and choose Home sharing. if you do not use Apple Music, select More>Shared and select the library you want to listen to.


3 Transfer Music From Old iPhone to iPhone X/8 via iTunes Store

Step 1: Launch the iTunes Store Application.

Step 2: Select More > Purchased.

Step 3: Select Purchased > Music.

Step 4: Select All Songs.

Step 5: Select Download All songs.


Download speed will depend on your internet connection and number of music to be downloaded.
4 Transfer Music From Old iPhone to iPhone X/8 via AirDrop

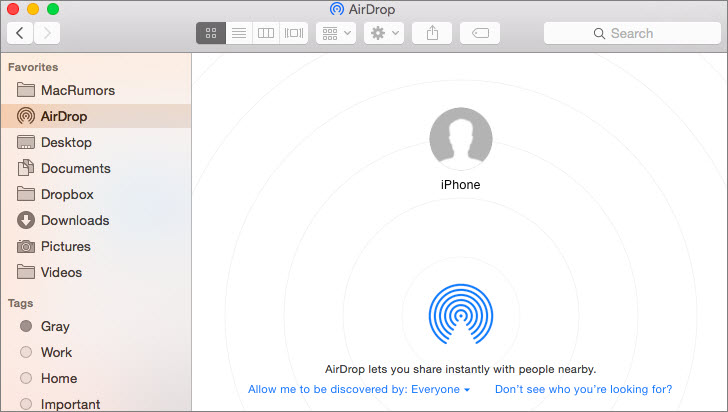
Step 1: Ensure that both devices are connected to Wi-Fi and have their Bluetooth turned on.

Step 2: On the target device: On iOS 10 and below; go to control center and select “AirDrop” on iOS 11 and above go to control center, press and hold the top left module and select “AirDrop”.

Step 3: Select either “Contacts Only or “Everyone” to enable “AirDrop”.

Step 4: On the source device, go to Apple Music and select the Music/Album to Transfer.

Step 5: Select the “…” symbol and tap on “Share Song/Album”.

Step 6: Select the icon for the target iPhone and wait for permission.

Step 7: Select “Accept” on the target iPhone to receive the song via AirDrop.

5 Transfer Music From Old iPhone to iPhone X/8 via Family Sharing

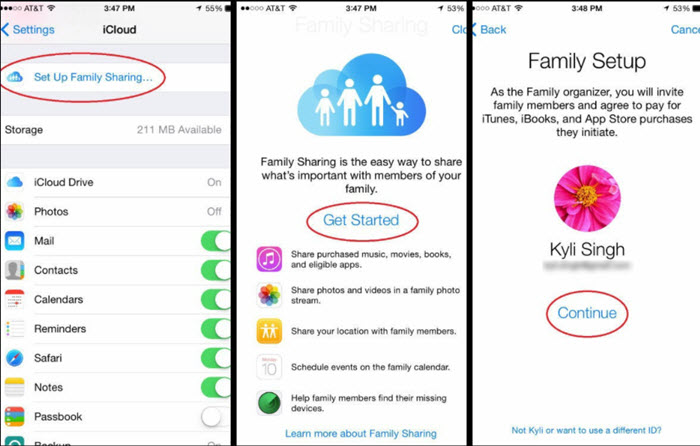
Step 1: Navigate to Settings > iCloud > Set up Family Sharing> Get Started > Continue on your device to activate Family Sharing. a credit or debit card is needed.

Step 2: As the organizer of the Family Share Plan, you will set up and be responsible for the payment of purchases of other members in the future.

Step 3: Select the “Add Family Member” option to add a family member to your group, you can add up to 5 people.

Step 4: Once you have configured Family Sharing, every member of the group can have access to each other’s music, TV shows, Apps, movies, books and so on. Go to iTunes Store > More > Purchased. You can choose a family member to download any song you wish from them.


Gihosoft Photo Eraser Erase unwanted objects and perfect your amazing photos!

If you lost data after you updated to a new iPhone, you can always use Gihosoft iPhone Data Recovery to get the data back from the old iPhone or backup.

Jihosoft Photo Eraser

Free iTunes/iPhone Backup Extractor for iPhone, iPad

iPhone Backup Extractor - Extract Data from iPhone Backup

Jihosoft Android Data Recovery: the best Android Data Recovery software for Windows and Mac to recover deleted contacts, messages, photos, videos, WhatsApp and etc from Android devices.

Gihosoft Android data recovery Free is a super awesome software specialized in Android file recovery. With this program, you are able to recover deleted photos, music, videos, messages, contacts, call logs, WhatsApp messages, Viber chat history and more from Samsung, Huawei, LG, HTC, Motorola, Google, Oneplus, Sony, Lenovo, ZTE and other Android devices directly.

You may also like:online youtube downloader

Related Articles


How to Transfer Videos from iPhone to Laptop without iTunes - iCloud Photo Library

How to Transfer Videos from iPhone to Laptop without iTunes - iCloud Photo Library


1 Transfer Videos from iPhone to Laptop without iTunes - iCloud Photo Library

There is another way to transfer your iPhone videos to laptop. In this method, you will need to use Apple’s iCloud Photo Library for the transfer. iCloud Photo Library automatically uploads photos and videos from your iPhone to your iCloud online storage.

Steps to Transfer Videos from iPhone to Laptop Using iCloud Photo Library

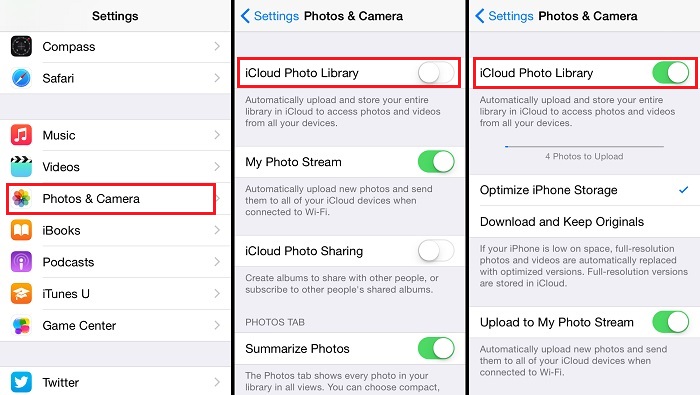
Step 1: First you will need to enable iCloud Photo Library on your iPhone. Follow these instructions:


Launch the Settings app on your iPhone and navigate to Photos section available in iCloud option and then turn on iCloud Photo Library. Now your captured photos and videos will be automatically uploaded to your iCloud storage.


Step 2: Once your videos are finished uploading, you can proceed to transfer them to your laptop. Follow these steps:


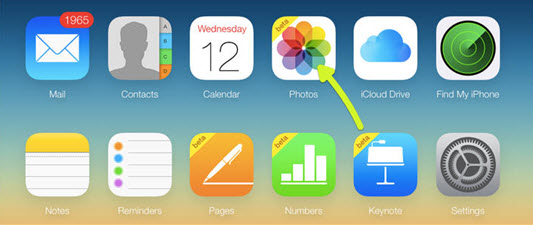
Visit icloud.com on your laptop’s web browser.


Log in using the same Apple ID you use on your iPhone.


Now click on Photos option available in the sidebar of the website. You will see a list of your uploaded photos and videos. Alternatively, you can also use Photos and Albums option if you can’t find Photos option in the sidebar.


Select the videos you wish to download to your laptop and then click on Download button (cloud icon available at the top). You can either download Unmodified Original format of the videos or there is also an option to download them in the Most Compatible format. Choose any option you wish and your download will start.

Note

There are some disadvantages of using this method to transfer iPhone videos to laptop:


Transfer speed will be relatively slow as compared to offline method (transfer via iMyFone TunesMate)


iCloud offers limited storage space, so if you have multiple videos then you might not be able upload and then download all your videos simultaneously.


This transfer method requires constant internet connection. In case of an internet problem, the transfer will fail.
2 Transfer Videos from iPhone to Laptop without iTunes - Dropbox

You can also use Dropbox to transfer your videos from your iPhone to your laptop. This method doesn’t require iTunes, but will need an internet connection.


Follow these steps to transfer videos from iPhone to your laptop using Dropbox:

Step 1: First, install Dropbox app on your iPhone as well as on your laptop.

Step 2: Now select the videos on your iPhone that you wish to transfer to your laptop and then upload them to your Dropbox account via Dropbox app.

Step 3: Once your videos are uploaded, use Dropbox app on your laptop (log in using the same ID) and navigate to your uploaded videos. Then select and download them on your laptop.

Gihosoft Photo Eraser Erase unwanted objects and perfect your amazing photos!

If you lost data after you updated to a new iPhone, you can always use Gihosoft iPhone Data Recovery to get the data back from the old iPhone or backup.

Jihosoft Photo Eraser

Free iTunes/iPhone Backup Extractor for iPhone, iPad

iPhone Backup Extractor - Extract Data from iPhone Backup

Jihosoft Android Data Recovery: the best Android Data Recovery software for Windows and Mac to recover deleted contacts, messages, photos, videos, WhatsApp and etc from Android devices.

Gihosoft Android data recovery Free is a super awesome software specialized in Android file recovery. With this program, you are able to recover deleted photos, music, videos, messages, contacts, call logs, WhatsApp messages, Viber chat history and more from Samsung, Huawei, LG, HTC, Motorola, Google, Oneplus, Sony, Lenovo, ZTE and other Android devices directly.

You may also like:online youtube downloader
How to Recreate an iTunes Library 2019


Method 1: Recreate an iTunes Library with iTunes

Recreating your iTunes library is very simple and straightforward. Here is how to:

Note: To be safe backup your iTunes Media folder somewhere else just in case something went unexpectedly.

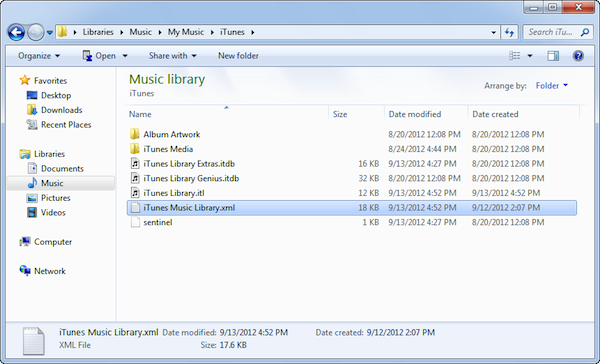
Step 1. Quit iTunes, and then navigate to the iTunes folder.

- If you are on a Mac : go Home > Music > iTunes

- On a Windows OS, the location might differ depending on the version you are using:


Windows 7 or later go to Users > [your username]> My Music > iTunes


Windows Vista go to Users > [your username] > Music > iTunes


Windows XP go to Documents and Settings > [your username] > My Documents > My Music > iTunes

Step 2. Once in the iTunes folder locate “iTunes Music Library.xml” file and move it to a different location of your choice by dragging and dropping or even cutting and then pasting.


Step 3. After that, find the “iTunes Library.itl” file from the iTunes folder and delete it entirely from your computer.


Step 4. Launch the iTunes application and then from the menu bar on the top left corner of its window click “File.”

Step 5. From the drawdown submenu that appears click Library > Import Playlist.


Step 6. A window will then pop up, use it to browse and navigate to the location where you moved the iTunes Music Library.xml file and click choose on a Mac or Open on windows.

iTunes will then use the iTunes Music Library.xml file to find all the media content you had before and then recreate a new “iTunes Library.itl” once done a new library with all your media and playlists will be recreated.

Gihosoft Photo Eraser Erase unwanted objects and perfect your amazing photos!

If you lost data after you updated to a new iPhone, you can always use Gihosoft iPhone Data Recovery to get the data back from the old iPhone or backup.

Jihosoft Photo Eraser

Free iTunes/iPhone Backup Extractor for iPhone, iPad

iPhone Backup Extractor - Extract Data from iPhone Backup

Jihosoft Android Data Recovery: the best Android Data Recovery software for Windows and Mac to recover deleted contacts, messages, photos, videos, WhatsApp and etc from Android devices.

Gihosoft Android data recovery Free is a super awesome software specialized in Android file recovery. With this program, you are able to recover deleted photos, music, videos, messages, contacts, call logs, WhatsApp messages, Viber chat history and more from Samsung, Huawei, LG, HTC, Motorola, Google, Oneplus, Sony, Lenovo, ZTE and other Android devices directly.

You may also like:online youtube downloader
Tips on HEIC to JPG Windows


Tips on HEIC to JPG Windows

There are some other ways of easily converting your HEIC to JPG PC in order to make them easy to share on Windows devices. They include:
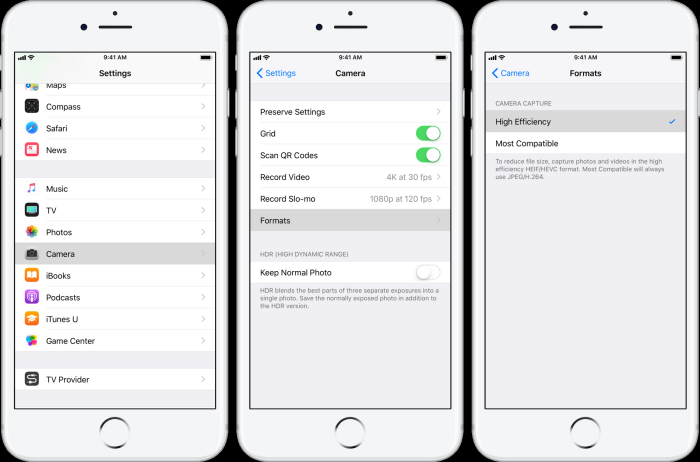
1. Altering your camera Settings

Click on setting on your phone, then Camera, Formats, then choose the most compatible under the Camera Capture option. This will ensure that all images taken will be in the JPG format.


2. Turn on Automatic Transfer

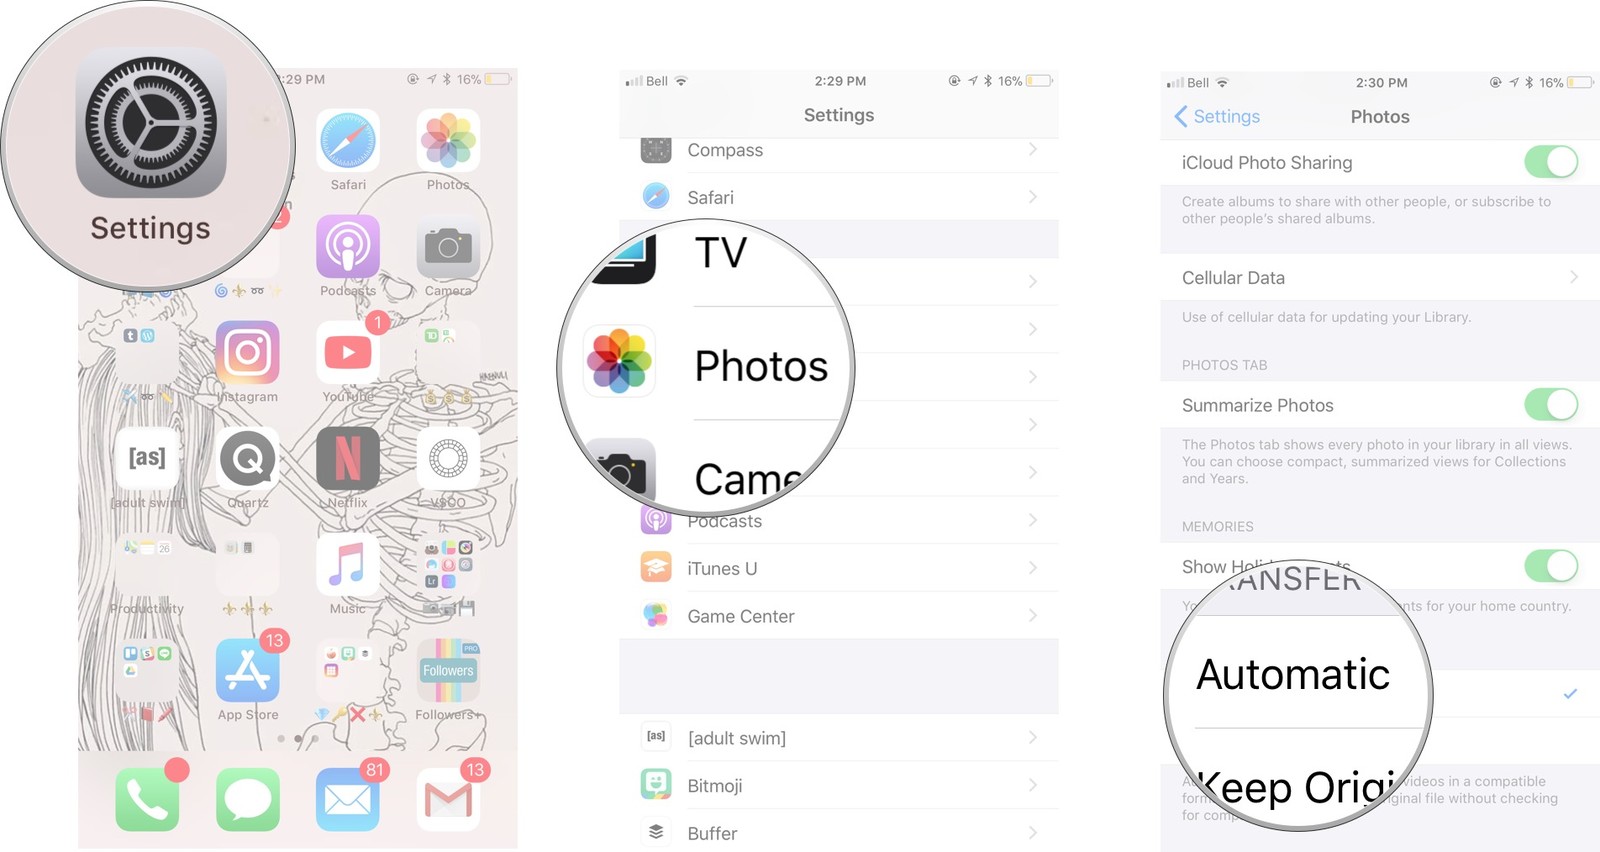
You can as well change your automatic transfer setting in order to always move images from iPhone to a mac or computer in a JPG format. Follow this instruction; Settings>Photos>>select Automatic under Transfer to Mac or PC.


Some Key Features of HEIC Files


It is able to compress to about half the size of similar images of equal quality compared to JPG.


HEIC allows for storage of multiple images in one file.


Its images can appear transparent just like GIFs.


It supports 16-bits color as opposed to the 8-bits on JPG.


Stores image edits which can be altered at later times.Gihosoft Photo Eraser Erase unwanted objects and perfect your amazing photos!


If you lost data after you updated to a new iPhone, you can always use Gihosoft iPhone Data Recovery to get the data back from the old iPhone or backup.


Jihosoft Photo Eraser


Free iTunes/iPhone Backup Extractor for iPhone, iPad


iPhone Backup Extractor - Extract Data from iPhone Backup


Jihosoft Android Data Recovery: the best Android Data Recovery software for Windows and Mac to recover deleted contacts, messages, photos, videos, WhatsApp and etc from Android devices.


Gihosoft Android data recovery Free is a super awesome software specialized in Android file recovery. With this program, you are able to recover deleted photos, music, videos, messages, contacts, call logs, WhatsApp messages, Viber chat history and more from Samsung, Huawei, LG, HTC, Motorola, Google, Oneplus, Sony, Lenovo, ZTE and other Android devices directly.


You may also like:online youtube downloader

Related Articles


2018年10月2日星期二

How to Transfer Ringtones from iPhone to iPhone


Transfer Ringtones from iPhone to iPhone Using iTunes

It only transfers purchased ringtones and works only on iTunes earlier than version 12.7.

Given that iTunes is the standard program for iOS data management, we’re going to be showing you how to transfer ringtones from iPhone to iPhone X/8 (plus) using iTunes. However, this method only supports the purchased tones from iTunes.


Open iTunes and connect your old iPhone using a USB cable.


Once loaded, click on “File > Device > Transfer Purchases from [device name]”. All the purchased files will be transferred from old iPhone to your iTunes, including purchased ringtones.


If you have some ringtones on your computer, you can also go to “File > Add Files to Library” to add the ringtones from computer to iTunes.


Disconnect your old iPhone and now connect your new iPhone.


Click on the device icon on iTunes, and click on the “Tones” option on the left menu then on “Sync Tones”.


Select the tones which you want to have synced, and click “Apply”.


Disadvantages:


You will miss your own custom ringtones when transferring.


It will erase the existing custom ringtones from the second iPhone when syncing.


You can't selectively transfer the ringtones.
3 How to Transfer Ringtones from iPhone to iPhone via OneDrive

With this next method, we’ll be showing you how to transfer ringtones from iPhone to iPhone without iTunes – instead, using OneDrive.


1. Download and install the OneDrive app on both of the iPhones.

2. Launch the app on your old iPhone and tap on “+” at the top-right.

3. Locate and select the ringtones that you want to transfer. Tap on “Upload”.

4. On your new iPhone, open the OneDrive app.

5. Sign in using the same login as before, and download the ringtones which you uploaded to your new iPhone.


With these steps, you can quickly transfer your ringtone over to your new iPhone X/8/8 +. However, you must have an internet connection and thus, it isn’t optimal.


4 Top 5 Websites to Download Ringtones for Free

Now that you know how to transfer ringtones between your iPhones, we’re going to show you the 5 best websites for downloading ringtones for free.
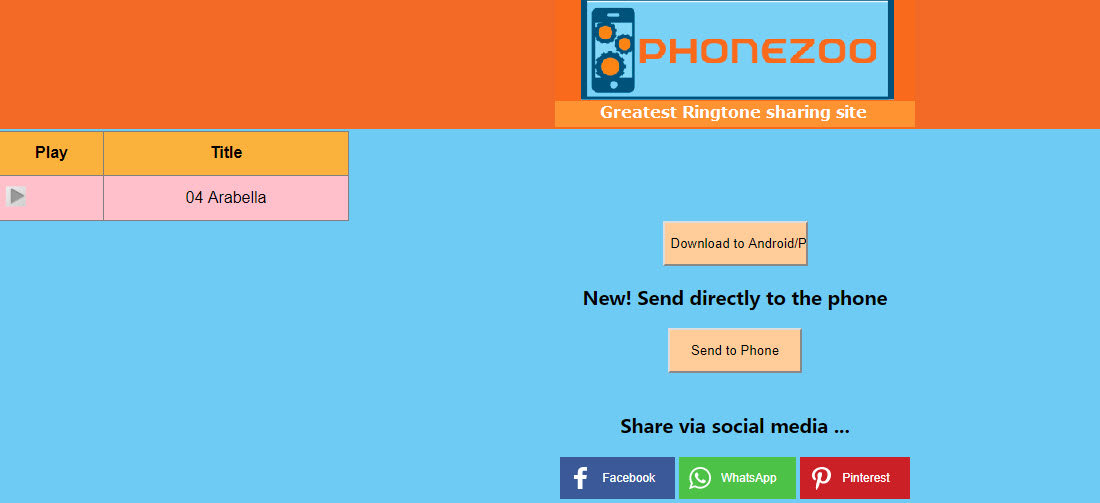
01 Phonezoo.com

First on our list is Phonezoo. This website is a little older than some of the others (as you’ll see from its design), although is still a reliable place to get ringtones and is updated regularly.


Step 1. Click on the ringtone that you want to download.

Step 2. Select either “Download” or “Send to Phone”.

Step 3. If you download, transfer the ringtone to your phone using one of the methods that we introduced you to above.

This relatively simple website includes a search bar, meaning that you can find exactly what you’re looking for.
02 Audiko.net

Audiko is similar to Phonezoo, although has an updated interface and has a lot more ways for you to find a unique ringtone. From their front page, you are able to see the most popular ringtones, featured artists, and you can search to find specific ringtones.


If you’re a ringtone creator, then you can also upload your own ringtones to share with others and you can download other’s creations!
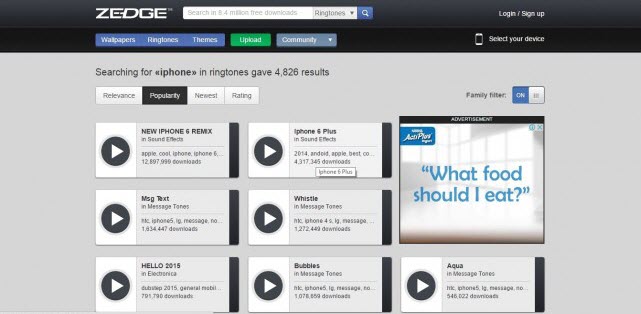
03 Zedge.net

Zedge is a step up from Audiko and has a much sleeker design as well as several ringtone filters, allowing you to find a ringtone that you’re happy with.


One great feature of this website is that you can add a compatibility filter by adding your device, resulting in only compatible ringtones appearing in your searches.
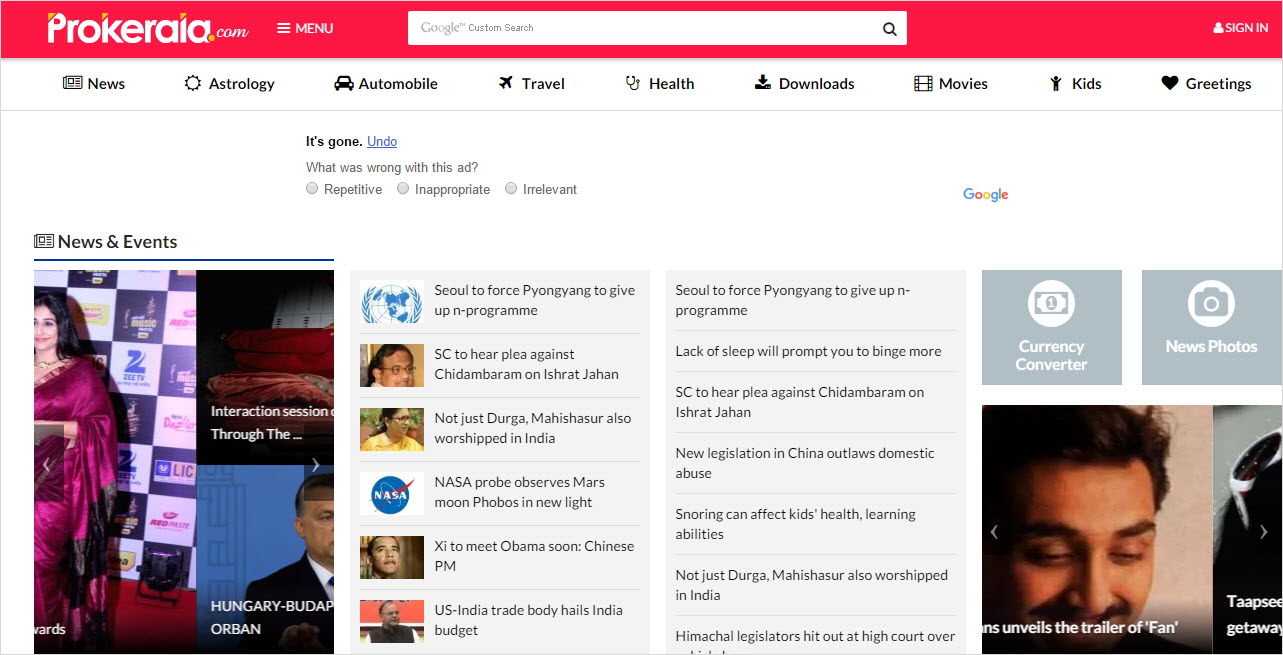
04 Prokerala.com

Prokerala is an informative website which provides custom ringtones on the side. One of the great things about this website is that you can either download your ringtones in either MP3 or M4R format, and anyone can upload their ringtones to the website – meaning if you want to share your ringtone creations, you can upload them for the world to see!


05 ListenToYouTube.com

While this website isn’t meant for iPhone ringtones, you can use it to download music from YouTube and once you have the music on your iPhone, you can set it as your ringtone.

Gihosoft Photo Eraser Erase unwanted objects and perfect your amazing photos!

If you lost data after you updated to a new iPhone, you can always use Gihosoft iPhone Data Recovery to get the data back from the old iPhone or backup.

Jihosoft Photo Eraser

Free iTunes/iPhone Backup Extractor for iPhone, iPad

iPhone Backup Extractor - Extract Data from iPhone Backup

Jihosoft Android Data Recovery: the best Android Data Recovery software for Windows and Mac to recover deleted contacts, messages, photos, videos, WhatsApp and etc from Android devices.

Gihosoft Android data recovery Free is a super awesome software specialized in Android file recovery. With this program, you are able to recover deleted photos, music, videos, messages, contacts, call logs, WhatsApp messages, Viber chat history and more from Samsung, Huawei, LG, HTC, Motorola, Google, Oneplus, Sony, Lenovo, ZTE and other Android devices directly.

You may also like:online youtube downloader


Step 1. Locate the YouTube video which you want to turn into a ringtone.

Step 2. Copy the URL of the YouTube video onto ListenToYouTube.com.

Step 3. Check the TOS box, and click GO. Once converted, click on the download link.
5 Bonus Tips to Use Ringtones on iPhone X/8 (Plus)

Given how frequently we have begun using our iPhones, it’s good to know everything that they’re capable of and how you can utilize what they have to offer. Below, we are going to show you some useful ringtone tips for iPhone X/8 (Plus).
Tip 1: How to Change Ringtone on iPhone

1. Unlock your iPhone and launch the “Settings” app.

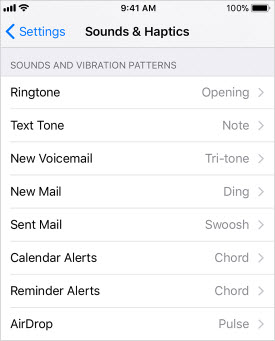
2. From here, tap on “Sounds” and you’ll be shown all of the available ringtone options.

3. Select the ringtone option, then tap on a sound to make it your ringtone and hear what it sounds like.

As you can tell, changing your iPhone’s ringtone settings isn’t difficult at all.
Tip 2: How to Apply a Ringtone to a Contact on iPhone

1. Unlock your iPhone and launch the “Phone” app.

2. Tap on the “Contacts” tab and tap on the contact for which you want to apply a ringtone to.

3. Tap on “Edit”, then tap on either “Ringtone” or “Text Tone”.


With these settings, you can set an individual’s ringtone so that you know who’s calling you before you even take your iPhone out of your pocket!

How to Transfer Videos from Laptop to iPhone using iTunes

How to Transfer Videos from Laptop to iPhone using iTunes

iTunes is Apple’s official tool to manage and transfer media files between your laptop and your iDevice. The program keeps all your music together, so you can easily find them whenever you are ready to listen to them.
Steps on Transfer Videos from Laptop to iPhone/iPad using iTunes

Follow this steps to transfer videos from computer to iPhone/iPad.

Step 1. Plug your iPhone/iPad to your laptop via the USB cable. The iTunes program will automatically launch itself, if not, manually start the software.

Step 2. Click on “File”, then click on the “Add Files to Library” icon on the left-hand corner of the window. Then you can select the video files on your computer.


Step 3. Open “My Computer” and go to your video folders. Then select the videos you want to copy. After selecting them, click on copy.

Step 4. Click on “Movies” in iTunes Library. Click on paste, to paste the movies you copied.

Step 5. Click on your iPhone/iPad name.

Step 6. Choose the “Movies” tab, and check on “Sync Movies”.


Step 7. Choose the videos you want to synchronize to your iPhone/iPad, then click on “Apply”
Cons of Copying Videos from Laptop to iPhone Using iTunes


Your previous videos will be erased during the sync process.


An iPhone can be synced to only one iTunes library. Or your iPhone will be erased.


The program always get stuck or crashed when syncing large videos.
How to Transfer Videos from Laptop to iPhone using Dropbox

You can use iMyFone TunesMate to transfer your videos from your laptop to your iPhone or iPad. However you can still have an alternative tool like Dropbox to perform such a task. But it would take more time and it would be more complex than iMyFone TunesMate when transfer videos or other data to your iPhone or iPad. iMyFone TunesMate is good option no matter you want to transfer files in bulk or singly.Gihosoft Photo Eraser Erase unwanted objects and perfect your amazing photos!

If you lost data after you updated to a new iPhone, you can always use Gihosoft iPhone Data Recovery to get the data back from the old iPhone or backup.

Jihosoft Photo Eraser

Free iTunes/iPhone Backup Extractor for iPhone, iPad

iPhone Backup Extractor - Extract Data from iPhone Backup

Jihosoft Android Data Recovery: the best Android Data Recovery software for Windows and Mac to recover deleted contacts, messages, photos, videos, WhatsApp and etc from Android devices.

Gihosoft Android data recovery Free is a super awesome software specialized in Android file recovery. With this program, you are able to recover deleted photos, music, videos, messages, contacts, call logs, WhatsApp messages, Viber chat history and more from Samsung, Huawei, LG, HTC, Motorola, Google, Oneplus, Sony, Lenovo, ZTE and other Android devices directly.

You may also like:online youtube downloader


The following are the steps of how to transfer videos from laptop to iPhone or iPad:

Step 1: Open Dropbox on your PC if you have one and sign into it.

Step 2: Go to upload and tap on the + icon to create a new folder or add new file.

Step 3: Then you can upload the videos you will to transfer to your iPhone.

Step 4: Next, launch the App on your iPhone and find the videos in the folder you created. Now you can download the videos to your iPhone.

2018年10月1日星期一

How to Permanently Delete Voice Memos on iPhone and iPad 2019


How to Permanently Delete Voice Memos on iPhone and iPad 2019


Voice Memos now has the same system for permanently deleting recordings that Photos app does. When you delete a recording for Voice Memos, it isn’t actually deleted. It shows up in the Recently Deleted folder. If you’re the kind who mistakenly deletes old memos, this feature will be really helpful for you.

But for the rest of us, this is just an additional step. Thankfully, there’s a way to automatically delete Voice Memos that you’ve marked to be deleted.
How to Permanently Delete Voice Memos on iPhone and iPad

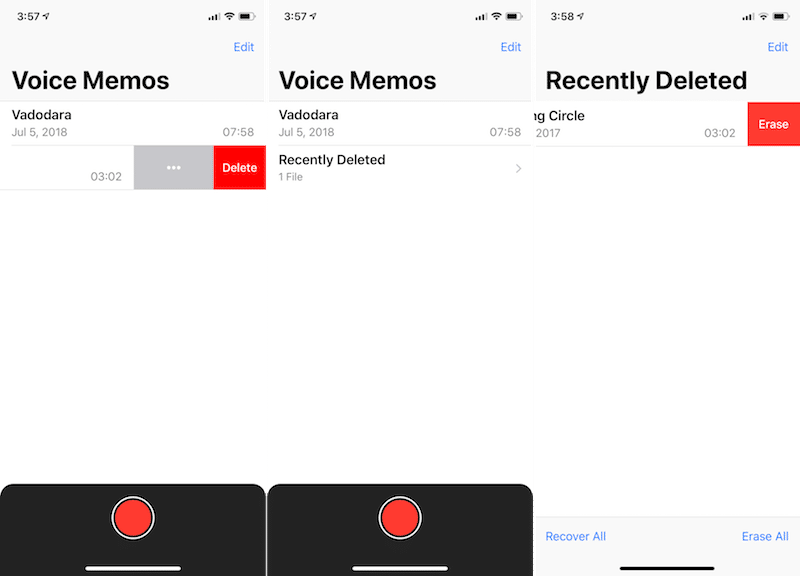
Step 1: Swipe left on the Voice Memo and tap on the Delete button.

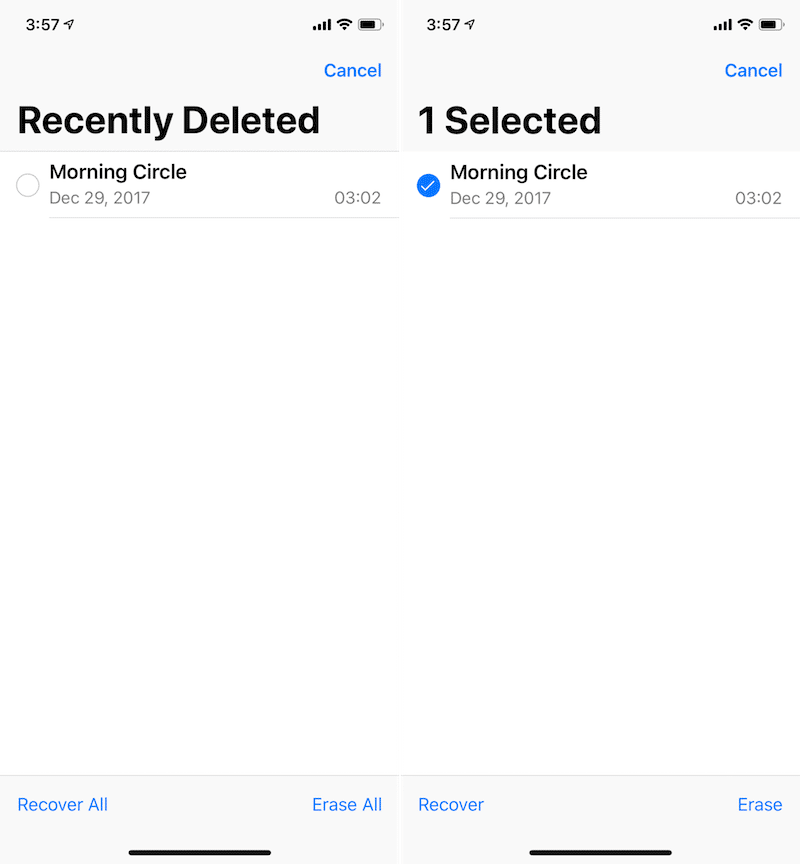
Step 2: Now the memo will end up in the Recently Deleted folder. So tap on it from the app’s home screen.


Step 3: Now swipe left on the note again and tap on the Erase button. You have no permanently deleted Voice Memos.

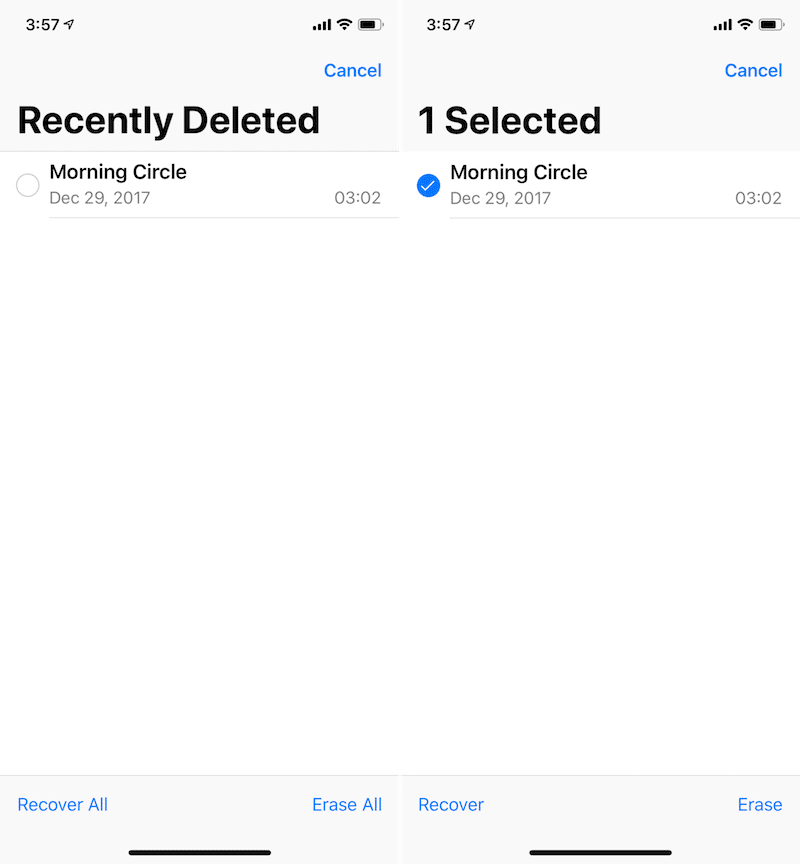
Step 4: In case you want to recover a recording, tap on the Edit button from Recently Deleted view and select the recording. Then tap on Recover.


That’s a bit tedious, right? So let’s automate this process.
How to Automatically Delete Voice Memos

This feature shows up as a setting item for Voice Memos. So we’ll have to go to the Settings app.

Read more: Here Are the 20 New iOS 12 Settings You Should Know About

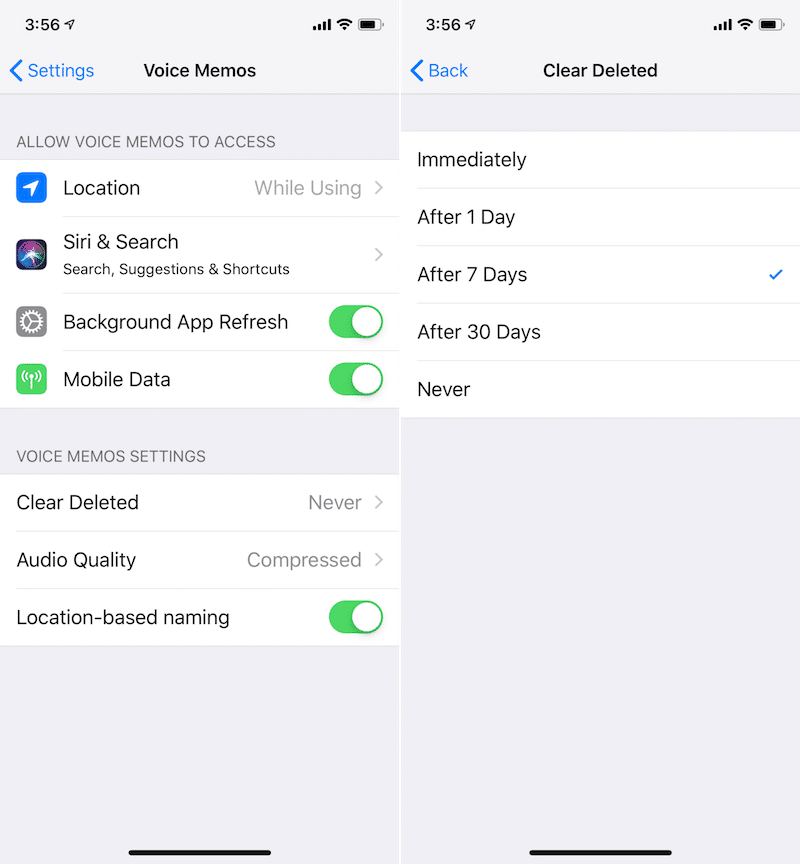
Step 1: Open the Settings app and look for the Voice Memos option.


Step 2: Tap on Clear Deleted.

Step 3: Here, you’ll see options like 7 Days, 30 Days, Never and Immediately. If you want your notes to be deleted permanently, always, tap on the Immediately option.

Step 4: The best option for most of us will be the 7 Days option. This way, you can go back and retrieve an old recording that you deleted by mistake.

Voice Memos now has the same system for permanently deleting recordings that Photos app does. When you delete a recording for Voice Memos, it isn’t actually deleted. It shows up in the Recently Deleted folder. If you’re the kind who mistakenly deletes old memos, this feature will be really helpful for you.

But for the rest of us, this is just an additional step. Thankfully, there’s a way to automatically delete Voice Memos that you’ve marked to be deleted.
How to Permanently Delete Voice Memos on iPhone and iPad

Step 1: Swipe left on the Voice Memo and tap on the Delete button.

Step 2: Now the memo will end up in the Recently Deleted folder. So tap on it from the app’s home screen.


Step 3: Now swipe left on the note again and tap on the Erase button. You have no permanently deleted Voice Memos.

Step 4: In case you want to recover a recording, tap on the Edit button from Recently Deleted view and select the recording. Then tap on Recover.


That’s a bit tedious, right? So let’s automate this process.
How to Automatically Delete Voice Memos

This feature shows up as a setting item for Voice Memos. So we’ll have to go to the Settings app.


Gihosoft Photo Eraser Erase unwanted objects and perfect your amazing photos!


If you lost data after you updated to a new iPhone, you can always use Gihosoft iPhone Data Recovery to get the data back from the old iPhone or backup.


Jihosoft Photo Eraser


Free iTunes/iPhone Backup Extractor for iPhone, iPad


iPhone Backup Extractor - Extract Data from iPhone Backup


Jihosoft Android Data Recovery: the best Android Data Recovery software for Windows and Mac to recover deleted contacts, messages, photos, videos, WhatsApp and etc from Android devices.


Gihosoft Android data recovery Free is a super awesome software specialized in Android file recovery. With this program, you are able to recover deleted photos, music, videos, messages, contacts, call logs, WhatsApp messages, Viber chat history and more from Samsung, Huawei, LG, HTC, Motorola, Google, Oneplus, Sony, Lenovo, ZTE and other Android devices directly.

You may also like:online youtube downloader
Read more: Here Are the 20 New iOS 12 Settings You Should Know About

Step 1: Open the Settings app and look for the Voice Memos option.


Step 2: Tap on Clear Deleted.

Step 3: Here, you’ll see options like 7 Days, 30 Days, Never and Immediately. If you want your notes to be deleted permanently, always, tap on the Immediately option.

Step 4: The best option for most of us will be the 7 Days option. This way, you can go back and retrieve an old recording that you deleted by mistake.

Related Articles


Also Read: