2018年9月6日星期四

5 Best Photo Video Maker With Music Apps For Android


Every photo is precious and unique in its own way. Because even though they are just still snapshots. But the memories in which they were taken are constantly running behind in your mind. You just open one special photo and it will make you travel back in time by simply watching them. Be it an amazing party, a memorable trip, some fascinating moment or any other events. People tend to capture those moments not just with their eyes but also through the lens of their camera so that those moments never slip. And as it is rightly said ‘Every picture tells a story’. But the main question is how to turn that still life into a moving story?You may also like:jihosoft iphone data recovery


So the simplest answer to that is to link those series of photos together which will make them convert into a video. And honestly, a perfect video made with still snapshots not just make the images more lively. But with the right touch of music simply makes you feel like the event is still happening. So, making your work a lot simpler, here is the list of 5 Best Photo Video Maker With Music Apps For Android that will cater to your every need. Also, these apps will not just help in your photo to video conversion journey but also will present you with a ton of effects and features to make your videos more remarkable.

Worth Reading: The Best Web Browser for Android

Best Photo Video Maker With Music Apps For Android:


VivaVideo


FilmoraGo


KineMaster


Quik


Adobe Premiere Clip
1. VivaVideo

Create your own photo montage right on your Android device with the help of VivaVideo. Simply shoot directly from the app or choose from your gallery which video or photos you want to edit. Once you have selected the multimedia you want. Then simply put your hands on the amazing tools that VivaVideo provides which is completely free. So after your photo to video conversion is completed. You can add music directly from the app which is fully licensed or select the music from your local library. Even if you are a layman in editing world you can still create a beautiful masterpiece with the help of VivaVideo.


Main Features:


HD export, no quality loss.


No Duration Limits, no watermark, no crop, no ads.


Easy-to-use, with a wide variety of functions.


Hundreds of pieces of free music all fully licensed.

Download
2. FilmoraGo

FilmoraGo is a video editing app which will help you to create an amazing video by using any clip from your Android’s memory. The app has an easy to use interface. Where you will find all the tools you require on the side of the screen. A project preview option in the middle and at the bottom your time controls. So simply select the photos you want to convert. And start with your process by adding themes, music, transitions and so much more. Once your fully done share your masterpiece on any social networking site you want. So create professional videos with no watermark or stamp with the help of FilmoraGo.


Main Features:


Preview clips in Real-time.


Supports imports from social networking like Facebook and Instagram.


Add music from FilmoraGo’s library of licensed songs.


Use music from your own device or start lip syncing.

Download
3. KineMaster

With the KineMaster app get great user experience. And a wide range of potent features that will help you to create professional videos in whichever way you want. Just select the photos you need, add a theme to them, or you can even add blocks of text or subtitles. Once you are done with the basic process get your hands on a number of amazing tools and features. For adding music, the app has a variety of audio effects with royalty free music. So join the mobile editing revolution with KineMaster and get a full featured professional video editor.


Main Features:


Multiple layers of video, images, effects, overlays, stickers, text, and handwriting.


Instant preview for all edits.


A variety of themes, animations, and visual and audio effects.


Real-time video and audio recording.

Download
4. Quik

Quik is an app that lets you work with photos and videos captured with your GoPro, phone or other devices. You can easily add up to 75 photos and video clips. The app also has a feature that detects faces and colors to frame each photo perfectly. So that you don’t have to waste time in editing each and every photo. But you can still anytime choose to crop them manually. Also one of the best parts of Quik is that it syncs everything to the beat of the music. Or else you can customize it in your own way text, music and more. So create awesome videos with few taps and enjoy the editing process with Quik app.


Main Features:


Choose from 23 video styles.


Easily reorder photos, video clips, and titles.


Change your video’s format from cinema to square for easy sharing on Instagram.

Download
5. Adobe Premiere Clip

Adobe Premiere Clip is a free video editor that can turn your images into a beautiful video with just a few taps. Simply select the images, and drop them in the order you like then start with your fast and creative editing process. Simply choose a soundtrack and select the pace or add your own music. The app has ‘Smart Volume’ that smooths audio levels between clips. And ‘Auto Mix’ dynamically balances soundtracks with your audio. So make your customized video that will look super amazing with the Adobe Premiere Clip app.


Main Features:


Automatic video creation.


Sounds great.


Photo motion.

Download


Related Posts:

The Best Photo Album Maker Apps with Songs

The Top Best Photo Gallery for Android

How to Make Video to Gif on Android

How to Fix Google Backup and Sync Not Working on Android

How to Download Music from Pandora on Android

How to Fix Snapchat not Working on Android?


Jihosoft Android Data Recovery is the most powerful and professional data recovery software for Android that can restore deleted or lost contacts, photos, videos, audios, SMS, call logs, WhatsApp chat, Viber messages from any Android devices due to accidental deletion, virus attack, formatting. It supports all popular Android smartphones and tablets like Samsung, HTC, LG, Huawei, Motorola, Nexus, etc. In the meantime, you will be guided step by step if you never used this kind of tool before.


Best Samsung Data Recovery Software: Easily Recover Deleted/Lost Photos, Messages, Contacts, Call Logs, WhatsApp,
Musics, Videos etc. from All Samsung Devices


If you find this article helpful or interesting do like and comment your views in the comment box.

2018年9月5日星期三

13 tips and tricks to make the most of your new Galaxy Note 9

13 tips and tricks to make the most of your new Galaxy Note 9

Continuing with the tradition of annual launches, Samsung is back again with a brand new addition to its Note lineup. And boy, it is amazing! With a top-notch processor under its hood and a stylus which can also function as a remote, the $1,000 Samsung Galaxy Note 9 is a pretty solid package.


Apart from the dual aperture camera and the customizable S Pen, the Galaxy Note 9 has a plethora of useful settings and features.

So, in this post today, we have curated the best Samsung Galaxy Note 9 tips, tricks, and hidden features to help you get the most out of this flagship phone.
1. TURN YOUR PHONE INTO A WI-FI REPEATER

Your brand new Galaxy Note 9 can also double up as a Wi-Fi Repeater. Yes, you read that right, and its setting is right there under the Wi-Fi settings (well, where else).


All you have to do is tap on the Mobile Hotspot option inside Settings > Connections > Mobile Hotspot and Tethering. Once inside, toggle both the Wi-Fi sharing and Mobile Hotspot to switch them on. That's it!


Now, the other devices will be able to connect to your phone just like any other Wi-Fi network. You can change the connection name and make the password a bit more complicated to prevent others from mooching off your personal Wi-Fi network.
2. ROCK THE ONE-HANDED MODE

With a 6.4-inch display, the Galaxy Note 9 is huge, and it's no joke to maneuver it with one hand. However, on some occasions when you do need to operate it single-handedly, the Note 9 has a nifty trick up its sleeves.


All you need to do is tap on the Home button thrice, and the screen will be resized in the blink of an eye. No more business of diving into the settings every time you want to do that.


To enable this setting, go to Advanced features > One-handed mode and toggle the switch for Button.
3. FINE-TUNE THE EDGE PANEL

With more than a dozen multipurpose panels, it's without a doubt that the Edge Panels are productivity boosters. By default, the Note 9 has only two active panels — People and Apps. So, if you're looking for more shortcuts, you can add them from Edge Settings (Display > Edge > Edge panels).

The Note 9 has only two active panels — People and Apps


All you have to do is select the panels that you need. What's more, you can reorder them as per your requirements. From calculators to news headlines, you can experiment with a lot here.


Furthermore, if you are not satisfied with the built-in ones, you can look for third-party options. To do so, tap on the three-dot menu (in the Edge Panels settings) and select Download.
4. HIDE THE NAVIGATION BAR

Want to ditch the navigation bar? Head over to Settings > Display > Navigation bar and toggle the switch for Show and hide button. That will add a tiny black button to the edge of the navigation bar, and when you double tap the tiny dot the bar will disappear. To retrieve the navigation bar, simply swipe up from the screen's edge.


Also, you can dress up the navigation bar in pastel colors through the native settings.
5. MAKE THE NOTIFICATIONS TRANSPARENT

Don't like the white block of text? Replace it with a transparent block. For that, head over to Display > Notifications and drag the slider for Transparency to High.


What's great about this trick is that the text color is automatically reversed to increase the screen legibility.
6. ADJUST THE DISPLAY COLOR

The Note 9 lets you choose from three different screen modes — Basic, AMOLED Photo, AMOLED Cinema, and Adaptive display. While the first three are auto modes, the adaptive display is customizable. So if you are someone like me who prefers warm screen tones over cool ones, you can set your preferred screen tones here.


You'd find these settings under Display and Screen Mode. If you know your way around the RGB color spectrum, tap on Advanced options and tweak the individual hues.

7. CHOOSE THE EDGE LIGHTING COLOR

Edge lighting is possibly one of the coolest effects in the Galaxy Note lineup. Earlier, the options to tweak the light were pretty limited. Now, thankfully, you can tweak the thickness, color, and effects as well. Just choose from one of the four different effects (Basic, Multicolor, Glow, and Glitter), and combine them with a thicker band and say hello to more drama!

You can tweak the thickness, color, and effects of the Edge lighting

To make the changes, you'd need to navigate to Display > Edge screen > Edge lighting > Edge lighting style. While you are at it, you can also change the apps for which you want to use the Edge lighting effects.


PRO TIP: Speaking of lighting effects, did you know that you can schedule the Blue Light filter as per your usage and requirements? Head over to Display > Blue Light Filter > Turn on as scheduled > Custom schedule and enter the time.
8. TWEAK THE ALWAYS ON DISPLAY SCREEN

Samsung's Always On Display (AOD) is one of my favorite features. The ease with which you can monitor notifications, time, battery levels and weather make it a 'too good to be true' feature.


Lately, Samsung has been including some brilliant add-ons to this feature, and one of the most recent ones is adding a GIF(How to Make Video to Gif on Android). To make your Lock Screen more interactive (and fun), you can have a pick from smiling rabbits to neon-colored parrots.

Head over to the lock screen settings and navigate your way to Always On Display > Settings > Image/GIF.


Tap on the Add GIF and choose from the available options. Alternatively, you can also download a third-party GIF and use it through the Add Image option.

But if you'd settle for something minimalistic, the Galaxy Note 9 has plenty of clock faces. Just select from the available range of clock faces (both analog and digital), pick your color and let the Always On Display screen shine.

NOTE: Did you know that you can turn the AOD screen off automatically when the battery reaches 15%?
9. REMEMBER FREQUENTLY ACCESSED WI-FI NETWORKS

The Galaxy Note 9 is smarter than most of the devices, and its built-in settings don't fail to prove the fact right. 'Turn on Wi-Fi automatically' is one such feature. As you may have deduced, this clever feature identifies your frequently accessed networks and based on the pattern, it'll connect to them automatically.


You'll find this option under Advanced Wi-Fi settings. All you need to do is enable it and let the Note 9 do the job of figuring out which one to connect.
10. ADD MORE CLOCK STYLES

Back in June 2018, Samsung released an impressive collection of clock faces for the AOD screen. However, they never released it to the Galaxy App store, which means you'll have to sideload the app.


So, if you are someone who loves tinkering with their phone, you can give this app a try. Once you've installed the app, the option to add the clock styles will appear at the end of the AOD Clock Style list.


Simply choose one and click on Apply, which will bring that specific style to the AOD page. Pick a color as per your wish and save. Thank me later.

11. PIN TEXT TO THE AOD

Are you someone who often forgets tasks and assignments? If yes, the Pin to AOD is one of your best options. As suggestive of its name, this brilliant trick lets you pin notes to the Always On Display screen so that you are reminded of the task at hand every time you look at your phone (which is more often than in our case, we'd like to admit).


All you have to do is make a text-only note in Samsung Notes app (preferably within 40 characters) and save it. Once done, tap on the Share icon > Text only and select Always On Display.


This way, the text will be pinned to the AOD screen. The default timing to display the notification is thirty minutes. However, if you wish to extend the time, double tap on the notification icon.
12. HIDE ALBUMS LIKE A PRO

Annoyed by the countless folders in your photo gallery? Worry not, now you can choose to hide them at your will. All you need to do is go to the Albums tab, tap on the three-dot menu and select Hide and unhide albums.


Just select the albums and tap on Apply. As simple as that.
13. TAG PEOPLE IN GALLERY

Remember the People feature of Google Photos? The Samsung Experience UI also has a similar feature. The only catch is that instead of any name, the person's contact needs to be present in the contacts.


Open a picture and tap on the person-shaped icon at the top. Tap on the face in a photo and enter a name from your Contacts. So, the next time you need the pictures of a specific person, tap on their name and voila!

PRO TIP: You can also create GIFs from the Gallery. As I said above, the three-dot menu hides the magic.


How to Check Android is locked or not? Here is check Android lock status and unlock the device

LIVE ON THE EDGE!

So, these were some of the tips and tricks along with some hidden settings of the Samsung Galaxy Note 9. Explore your new phone and do let us know if you discovered any new tricks.


Must Check Out Posts:


The Best Android Backup Apps 2019How to Restart Android without Power Button

The Best Ringtone Apps for Android

How to Check Android Phone is Locked or Unlocked

What to Do If Your Google Play Store Stops Working?

Top 5 Best Antivirus Apps for Android for Virus Removal


Jihosoft Android Data Recovery is the most powerful and professional data recovery software for Android that can restore deleted or lost contacts, photos, videos, audios, SMS, call logs, WhatsApp chat, Viber messages from any Android devices due to accidental deletion, virus attack, formatting. It supports all popular Android smartphones and tablets like Samsung, HTC, LG, Huawei, Motorola, Nexus, etc. In the meantime, you will be guided step by step if you never used this kind of tool before.


Jihosoft WhatsMate is an all-in-one WhatsApp Manager which can be used as a complete solution to backup, restore, recover and transfer WhatsApp chat history, contacts, call logs, pictures, videos, audio messages and all other WhatsApp attachments on Android & iPhone.


2018年9月3日星期一

4 Tools to Delete Old Apple ID from iPhone Without Password

4 Tools to Delete Old Apple ID from iPhone Without Password 2019


4 Tools to Delete Old Apple ID from iPhone Without Password
DoulCi Activator

This is a popular tool used to delete old Apple ID from iPhone without the password. The tool is free. You can use it to delete old Apple ID from iPhone/iPad/iPod Touch running on iOS 11.3 and below. The tool is yet to be tested on iOS 12 beta. The tool will work on Mac, Windows, and Linux.

Official iPhone Unlock

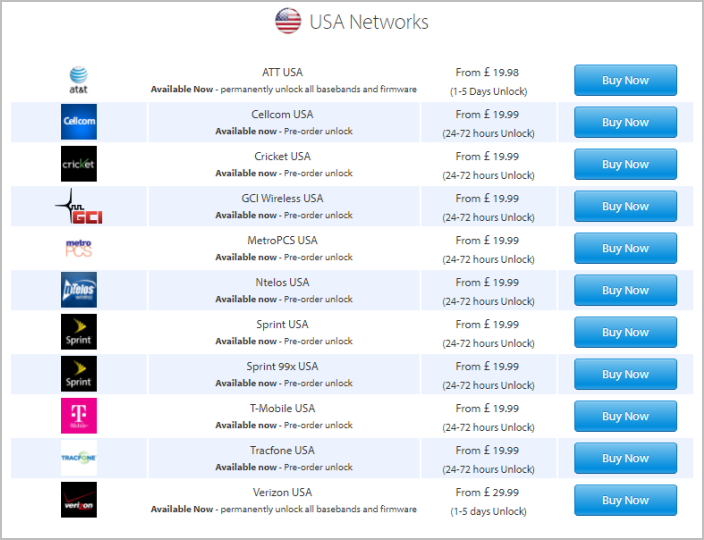
This tool will help you delete old Apple ID on all iOS devices. It will work on all iPhones including iPhone X. It will help you delete old Apple ID on your iPad too. This tool supports iOS 11 and below. The tool is not free which means that you have to pay for it before you get to delete the Apple ID. On top of erasing your old Apple ID, the tool offers other features such as permanent SIM unlock, instant carrier checking, and more.

GadgetWide

This is an effective tool when it comes to deleting old Apple ID on iPhone without a password. The tool supports other iOS devices including iPads and iPod Touch. You can download GadgetWide for free. This tool does support all iOS versions up to iOS 10. One of the great things about using GadgetWide is that it does have tutorial videos which will help you if you happen to get stuck while deleting your old Apple ID.


iCloudin

This tool will work with all iOS devices. It is capable of helping you delete old Apple ID on iPad, iPhone, and iPod touch. For the tool to help you unlock your device, it will need you to have iTunes 12+ installed on your computer. It works on a Windows PC. For it to do its job, the windows PC needs to have Microsoft NET. Framework 4.5 installed on it. Also, it will need you to have access to an internet connection.


You may also like:Gihosoft Mobile Transfer: 1 Click Data Transfer from Phone to Phone

Gihosoft Android data recovery Free is a super awesome software specialized in Android file recovery. With this program, you are able to recover deleted photos, music, videos, messages, contacts, call logs, WhatsApp messages, Viber chat history and more from Samsung, Huawei, LG, HTC, Motorola, Google, Oneplus, Sony, Lenovo, ZTE and other Android devices directly. Meanwhile, this Android data recovery software is available for both Windows and Mac platforms.For now, check:Free iTunes/iPhone Backup Extractor for iPhone, iPad

Jihosoft iTunes Backup Extractor free is a powerful tool to recover and extract important data from iPhone, iPad & iPod touch backup on Windows or Mac.

If you can’t sync with iTunes and want to rescue data from a disable iPhone, you could try Gihosoft iPhone Data Recovery. Also feel free to ask questions on the iDevice is disabled error in the comments section below.

How to Tell if Your iPhone 8 is Eligible For a Free Logic Board Replacement


How to Tell if Your iPhone 8 is Eligible For a Free Logic Board Replacement


If you have an iPhone 8 that seems to be having trouble, it might need a new logic board. Late last week, Apple revealed that faulty logic boards may have been causing random restarts, screen freezes, and defective startup initiations that prevent the iPhone 8 from turning on properly. If these issues sound like something you’re dealing with, you can get your phone repaired for free.


How to Charge Your iPhone Faster


The affected units were purchased between September 2017 and March 2018 in the U.S, Australia, China, Hong Kong, India, Japan, Macau, and New Zealand.

The recall only involves the iPhone 8, so if you purchased another model then this doesn’t apply to you, even if you’re having the same problems and purchased your phone at the same time.

To see if your phone qualifies, you just need to input its serial number in the Apple official website. Your serial number is printed on the back of your device in super tiny print. You can also find it by going into the Settings menu and then selecting General followed by About.

If your phone is one of the chosen ones, you can get it repaired by making an appointment at your local Apple Retail Store or an Apple Authorized Service Provider. You can also mail the device into an Apple Repair Center.


Using iPhone for a long time may bring various problems, such as pop-up of storage almost full. As an iPhone user, it’s high recommended to get hold of several tricks to free up iPhone space and clearing history and app cache of your iPhone.

If you lost or accidentally deleted important data, like messages or contacts, you can use Gihosoft iPhone Data Recovery to easily get them back from iPhone even without backup.


Free iTunes/iPhone Backup Extractor for iPhone, iPad

Jihosoft iPhone Backup Extractor is a powerful tool to recover and extract important data from iPhone, iPad & iPod touch backup on Windows or Mac.


2018年9月2日星期日

Samsung Galaxy Watch vs Apple Watch Series 3

Samsung Galaxy Watch vs Apple Watch Series 3

Apple has dominated the smartwatch industry ever since it seeded the first Apple Watch in back in 2015. Several new wearable vendors have tried to gain market share, but haven’t been able to eat into Apple Watch’s pie so far. Can the Samsung Galaxy Watch do what others couldn’t? The revamped success of the Gear S3, introduced alongside Galaxy Note 9, provides far superior battery life than the Apple Watch and offers a range of health benefits and features.

Let’s compare the two’s features, specs, design and value for money to find out.
Cost & Availability

Apple Watch series 3 was launched in 2017 (autumn) and is available for $329. However, this pricing would get you just the basic GPS version. You’d have to shell out $399 if you want to get GPS + cellular. Additionally, there’s a larger, costlier model available. It costs $1,399 and includes a range of luxury materials and straps. You can buy it from Apple directly or contact us for a deal.

The Galaxy Watch’s Bluetooth version will come out on September 7 but you can pre-order it now as well. If you do, Samsung will put in a “Wireless Charger Duo” that enables you to change a Samsung handset and the Galaxy Watch together. For the LTE model, there’s no schedule date of launch but it can arrive in 2018.

Consumers have to shell out GBP279 for the 42 mm model and GBP299 for the model that’s 46mm if they purchase directly from Samsung. In the United States, the starter model retails for $329.99. The Bluetooth model will also be available in stock at EE’s for GBP329. The pricing for the LTE model is not yet publicly announced, but we expect it to cost GBP100 more than the Bluetooth model.
Build & Design

Smart readers will immediately see the difference in design philosophy in the two branded watches. Samsung went for a circular screen, while Apple went for a rectangular one.

The approach taken by Samsung gives off a more classic look, and many buyers prefer that. However, Apple went for the favorite Shape that Steve Jobs made famous – the rounded-corner rectangle. This shape displays the text really well.

Samsung is endorsing its military-grade durability of the watch, featuring the advanced screen protection (Corning Gorilla Glass DX+). However, the Apple Watch too is tough; the more expensive models are manufactured using Iox-X glass while others utilize sapphire crystals.
Color Availability

The body of the Apple Watch comes in 8 material/color combinations: Space Grey, gold, Rose Gold or white aluminum; dark grey or white ceramic; and black stainless steel or stainless steel. In addition, you can choose from a big variety of materials, designs and colors.

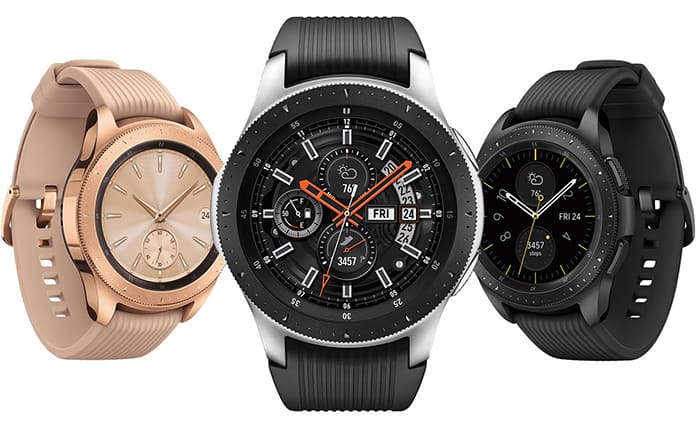
In contrast, the Galaxy Watch is available in three colors: the 46mm model is available in silver, while the 42mm model is available in pink and black. Then again, there are straps and customizable watch faces available for it as well.
Galaxy Watch in images:

And here are high-quality shots of the Samsung Galaxy Watch:


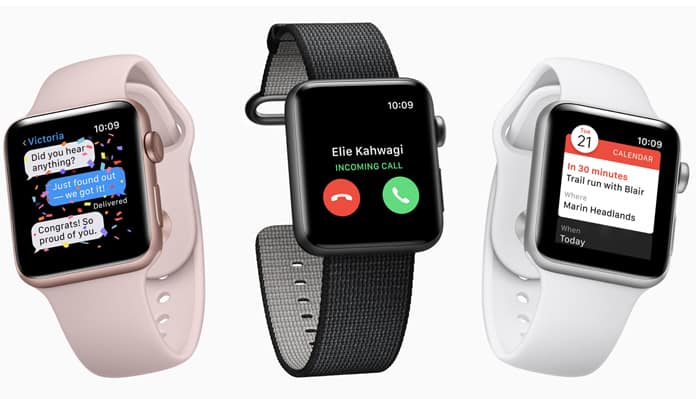
Apple Watch in images

Perhaps the best route to weighing up the aesthetic appeal of the Apple Watch is to let its images do the talking. Here’s how the Apple Watch Series 3 looks:


See Also: Gihosoft Android data recovery Free is a super awesome software specialized in Android file recovery. With this program, you are able to recover deleted photos, music, videos, messages, contacts, call logs, WhatsApp messages, Viber chat history and more from Samsung, Huawei, LG, HTC, Motorola, Google, Oneplus, Sony, Lenovo, ZTE and other Android devices directly. Meanwhile, this Android data recovery software is available for both Windows and Mac platforms.For now, check:Free iTunes/iPhone Backup Extractor for iPhone, iPad

Jihosoft iTunes Backup Extractor free is a powerful tool to recover and extract important data from iPhone, iPad & iPod touch backup on Windows or Mac.
Features & Specs

We’ll provide you with the complete tech specs in a bit, but first we’ll see the features of each device.

The Apple Watch includes Apple Pay, which allows users to pay in retail outlets without needing a wallet. They don’t even have to take out their smartphone from their pocket. The Galaxy Watch features Samsung Pay. Several banks have signed up to allow its usage, but some names are excluded.

Apple Watch Series 3 also offers 2x to 4x more storage space than its rival, depending on the version you select, although smart watches don’t have a dire need for storing files. One of the few things the storage can be handy for is music for outdoor runs. Apple’s version is also lighter than its rival.

The Galaxy Watch’s screen is always-on. Apple Watch switches off to save battery, and wakes up when a user rotates his/her wrist. Apple’s watch claims just 18 hours, and if if it’s a non-cellular model, it can last up to 2 days.

An important aspect of the battery comparison that you might overlook is that Samsung Galaxy Watch’s sleep companion is far superior. There’s less requirement to charge it during nighttime. In fact, it is designed to monitor the user’s stress levels, as well as their sleep cycles. And like the Apple Watch, there’s a guided-breathing relaxation function on offer.

Both Apple Watch Series 3 and Galaxy Watch are water-resistant and can survive in a swimming pool, which is beneficial for swimming enthusiasts. The first model of Apple Watch didn’t have such credentials, and was labeled ass suitable for using in shower but not using underwater. Since then, Apple Watch has arrived with upgraded hardware and software, because of which it can be used in a variety of swimming workouts.

Both watches have voice assistants as well. Samsung comes with Bixby, while Apple has Siri. Both aren’t world-class.

Lastly, the Galaxy Watch is compatible with any phone using Android 5.0 or above, or with an iPhone 5 or above with iOS 9.0 or above. The Apple Watch just functions with iPhones.

See Also: Best Apple Watch Alternatives
Specs of Apple Watch


Wireless chip (W2)


Dual-core processor (S3)


Speculated RAM of 768MB


53-inch OLED screen, 312 * 390 in the 42 mm model, or 1.34-inch OLED screen, 272*340 in the 38 mm model, Force Touch


16GB or 8 GB storage for cellular/GPS models


4GHz WiFi (802.11b/g/n), Bluetooth 4.2


Wireless inductive charging and rechargeable battery (18 hours battery life)


ISO standard 22810:2010 water-resistant up to 50m


watchOS4


7 grams of weight for 38 mm model GPS aluminum and 52.8 grams weight for the stainless steel 42 mm model, without strap


6mm * 33.3mm * 11.4mm/42.5mm * 36.4 mm * 11.4mm (38mm/42mm, steel or aluminum variants); 39.2mm * 34mm * 11.8mm/42.6mm * 36.5mm * 11.4mm (ceramic model)
Specs of Galaxy Watch:


15 GHz dual-core Exynos 9110 processor


4Gb storage


5GB or 768MB RAM for LTE/Bluetooth model


270/472 mAh battery; claimed battery life of 4 days; wireless charging (WPC-based)


2-inch or 1.3-inch AMOLED screen (42 or 46 mm model; 360*360 for both), comes with Gorilla Glass DX+


46mm * 49mm * 13mm/41.9mm * 45.7mm * 12.7mm; 49/63 g (without straps)


Wearable OS 4.0 (Tizen-based)


MIL-STD-810G, 5ATM, IP68


Accelerometer; heartrate monitor, ambient lighting, gyro, baro meter


NFC, A-GPS/GLONASS, Bluetooth 4.2, WiFi, 3G/4G
Software

watchOS is present on the Apple Watch. By default, watchOS 4 is going to be pre-installed if you purchase right now, with an option to install watchOS5 when it is released in autumn. watchOS is quite user-friendly with several pre-installed applications; most being fitness apps. That said, you’d find several useful third-party apps as well.

In contrast, the Samsung Watch comes with Tizen, Samsung’s own OS. Tizen is also user-friendly (comes with circular menus that the user controls via bezel rotation) and excellent fitness apps. However, the third-party app offering isn’t as versatile as Apple’s.Must Read:tumblr video downloader
Final Thoughts

The Apple Watch Series 3 is a fantastic smartwatch that truly deserves acclaim in the wearables space. We suggest buying the GPS variant, since the cellular model is expensive and consumes more battery. It looks sleek, has a variety of third-party apps and after a few months will host a new OS. The Galaxy Watch doesn’t have an extensive range of third-party apps, so we consider it a simpler offering; more of a FitBit than a full-mature smartwatch that has peaked in its prime. But it’s great if you’re looking for a cost-friendly option that comes with robust sleep tracking and better battery life. In the end, the decision is yours to take.

How to Transfer from iPhone to iPhone Using iCloud

How to Transfer from iPhone to iPhone Using iCloud

Transferring files from one iPhone to another iPhone using iCloud is fairly straightforward. Here is how you do it:

(1) First, sign out of all of your accounts and unpair any devices from your first phone (the one you're transferring the data from), such as your Apple Watch.

(2) Make sure that the first iPhone is also connected to a strong WiFi network.

(3) On your phone, go to Settings > [The Name on Your Account> iCloud > iCloud Backup. Turn iCloud Backup on at this time by tapping the slider.

(4) Your phone will now attempt to back itself up to iCloud. Wait the first iPhone to finish the backup.

(5) Turn on the second iPhone. Assuming, it's new, it should have an introductory Hello screen.

(6) Just press the Home button and follow the on-screen instructions until you are asked to join a WiFi network. Join your network, and then continue following the instructions.

(7) When you are at the Apps & Data screen, notice where it says Restore From iCloud Backup. Tap that, then hit Next.

(8) You will be asked to sign in. Do so with your Apple ID and password.

(9) From the list, choose which backup you want to transfer data from it (probably the latest one).

(10) Now wait until the backup is restored. After this is done, you can continue your setup normally by following the instructions on the screen.


In addition, if you are connected to WiFi, then your phone should sync with iCloud and automatically download all of the media that you own.

Must Read:tumblr video downloader

Must Read:Jihosoft iTunes Backup Unlocker

You may also like:online youtube downloader
How to Transfer Data From iPhone to iPhone Using iTunes

Another way to transfer data between iPhones is by simply using iTunes. This is probably one of the most popular methods, even though it's not the best one. Here is how you do it:

(1) Connect the first iPhone to your computer and launch iTunes.

(2) Go to the Help menu and check for updates. If there is one, then install it first.

(3) Click on your device icon.

(4) Click Back Up Now on the summary page for your device.

(5) Wait until it is done backing up. You can check to make sure it backed up correctly by going to iTunes Preferences > Devices. There will be a list of devices as well as when they were backed up. Look for yours.

(6) Next, turn on the second iPhone until you get to the Hello screen. Press the Home button and follow the directions until you get to the Apps & Data screen.

(7) Tap Restore iTunes From Backup and then tap Next.

(8) Plug the iPhone into your computer.

(9) Open up iTunes, then click on your device icon.

(10) In the summary page, click Restore Backup…

(11) Pick a backup to restore from, then wait for the backup to restore. After that is done, you can proceed with the setup process on the second iPhone.


As you can see, just like the iCloud method, this basically consists of backing up one device and then restoring the backup on the other.

Also Read: